THINGS TO KNOW BEFORE STARTING YOUR VEHICLE
CONTENTS
■ A Word About Your Keys 11
Ignition Key 11
Key-In-Ignition Reminder 12
■ Sentry Key Immobilizer System —
If Equipped 12
Important Note About Service 13
Replacement Keys 13
Customer Key Programming 13
General Information 14
■ Steering Wheel Lock — If Equipped 14
To Manually Lock The Steering Wheel 14
To Release The Steering Wheel Lock 14
- Illuminated Entry — If Equipped 15
- Doors And Locks 15
□ Door Locks 15
- Occupant Restraints 16
Lap/Shoulder Belts 17
Adjustable Upper Shoulder Belt Anchorage ... .21
Seat Belts And Pregnant Women 21
Seat Belt Extender 21
Driver And Front Passenger Supplemental
Restraint Systems (SRS) — Airbags 22
Child Restraint 29
- Engine Break-In Recommendations 39
10 THINGS TO KNOW BEFORE STARTING YOUR VEHICLE
- Safety Tips 40 □ Safety Checks You Should Make Outside The Vehicle 41
Exhaust Gas 40
Safety Checks You Should Make
Inside The Vehicle 41
THINGS TO KNOW BEFORE STARTING YOUR VEHICLE 11
To remove the ignition key on models with an automatic transmission, place the gearshift lever in P (Park), turn the ignition key to LOCK, and remove the key.
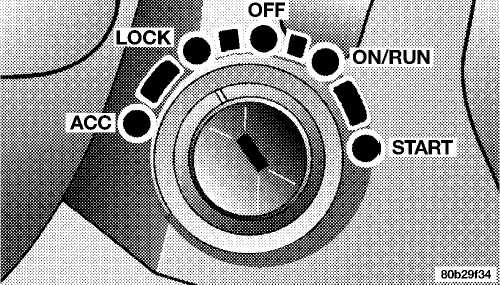

To remove the ignition key on models with a manual transmission, depress and hold the key release button, turn the ignition key to LOCK, and remove the key.
12 THINGS TO KNOW BEFORE STARTING YOUR VEHICLE
Key-In-Ignition Reminder
Opening the driver’s door when the key is in the ignition, sounds a signal to remind you to remove the key.
CAUTION!
Always remove the key from the ignition, and lock all doors when leaving the vehicle unattended.
SENTRY KEY IMMOBILIZER SYSTEM — IF EQUIPPED
The Sentry Key Immobilizer System (SKIS) prevents unauthorized operation of the vehicle by disabling the engine. The system will shut the engine down after 2 seconds of running if an invalid key is used to start the vehicle. This system utilizes ignition keys which have anelectronic chip (transponder) embedded into them. Only keys that have been programmed to the vehicle can be used to start and operate the vehicle for longer than the 2 second validation time period.
The Sentry Key Immobilizer System does not need to be armed or activated. Operation of the system is automatic
regardless of whether or not the vehicle is locked or unlocked. During normal operation, the SKIS indicator light will come on for 3 seconds immediately after the ignition switch is turned on for a bulb check. Afterwards, if the bulb remains on, this indicates a malfunction in the electronics. If the bulb begins to flash immediately after the ignition switch is turned on, this indicates that an invalid key is being used to start the vehicle. Both of these conditions will result in the engine being shut down after 2 seconds of running. Keep in mind that a keywhich has not been programmed is also considered an invalid key even if it is cut to fit the ignition for that vehicle.
If the SKIS indicator light comes on during normal vehicle operation (it has been running for longer than 10 seconds) a fault has been detected in the electronics and the vehicle should be serviced as soon as possible.
NOTE:
• The Sentry Key Immobilizer System is not compatible with remote starting systems. Use of these systems may result in vehicle starting problems and loss of security protection.
THINGS TO KNOW BEFORE STARTING YOUR VEHICLE 13
• Mobil Speedpass™, additional Sentry Keys, or any other transponder equipped components on the same keychain will not cause a key-related (Transponder) fault unless the additional part is physically held against the ignition key being used when starting the vehicle. Also, cell phones, pagers, or other RF electronics will not cause interference with this system.
All of the keys provided with your new vehicle have been programmed to the vehicle electronics.
Important Note About Service
A four digit PIN number is needed to service the Sentry Key Immobilizer System. This number can be obtained from your authorized dealer. However, this number can also be found on your customer invoice that you were given upon receipt of your vehicle.
Replacement Keys
NOTE: Only keys that have been programmed to the vehicle electronics can be used to start the vehicle. Once a Sentry Key has been programmed to a vehicle, it cannot be programmed to any other vehicle.
At the time of purchase, the original owner is provided with a four digit PIN number. This number is required for dealer replacement of keys. Duplication of keys may be performed at an authorized dealer or by using the Customer Key Programming procedure. This procedure consists of programming a blank key to the vehicle electronics. A blank key is one which has never been programmed.
NOTE: When having the Sentry Key System serviced, bring all vehicle keys to the dealer.
Customer Key Programming
You can program new keys to the system if you have two valid keys by doing the following:
Cut the additional Sentry Key Transponder blank(s) to
match the ignition switch lock cylinder key code.
Insert the first valid key into the ignition switch and
turn the ignition switch ON for at least 3 seconds but no
longer than 15 seconds. Turn the ignition switch OFF and
remove the first key.
14 THINGS TO KNOW BEFORE STARTING YOUR VEHICLE
Insert the second valid key and turn the ignition
switch ON within 15 seconds. After ten seconds, a chime
will sound and the SKIS indicator light will begin to
flash. Turn the ignition switch OFF and remove the
second key.
Insert a blank Sentry Key into the ignition switch and
turn the ignition switch ON within 60 seconds. After 10
seconds, a single chime will sound. The SKIS indicator
light will stop flashing, turn on for 3 seconds; then turn
off.
The new Sentry Key has been programmed. Repeat this process to program up to a total of 8 keys.
General Information
The Sentry Key Immobilizer System complies with FCC rules part 15 and with RSS-210 of Industry Canada. Operation is subject to the following two conditions:
This device may not cause harmful interference.
This device must accept any interference that may be
received, including interference that may cause undes-
ired operation.
STEERING WHEEL LOCK — IF EQUIPPED
Your vehicle may be equipped with a passive steering wheel lock (manual transmission only). This lock prevents steering the vehicle without the ignition key. If the steering wheel is moved a half turn in either direction and the key is not in the ignition, the steering wheel will lock.
To Manually Lock the Steering Wheel
With the engine running, rotate the steering wheel 1/2 revolution from straight ahead position, turn off the engine and remove the key. Rotate the steering wheel slightly in both directions until the lock engages.
To Release the Steering Wheel Lock
Insert the key in the ignition and turn the wheel slightly to the right or left to disengage the lock.
NOTE: If you turned the wheel to the right to engage the lock, you must turn the wheel slightly to the right to disengage it. If you turned the wheel to the left to engage the lock, turn the wheel slightly to the left to disengage it.
THINGS TO KNOW BEFORE STARTING YOUR VEHICLE 15
ILLUMINATED ENTRY — IF EQUIPPED
The interior lights will come on when you open any door.
The lights will remain on after all of the doors are closed, and then fade to off or they will immediately fade to off once the ignition switch is turned on.
DOORS AND LOCKS
NOTE: The ignition key that is used to start the vehicle is used to lock or unlock the doors, tailgate, console storage, and glove box.
To unlock doors and tailgate insert the key and turn. Once unlocked, the tailgate can be opened or closed without using the key.
To open the tailgate, lift the latch release and swing open the tailgate.
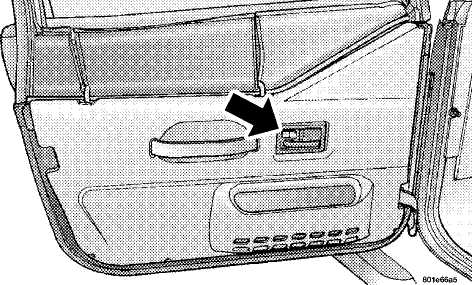
Door Locks
Doors on both hard-top and soft-top models are equipped with a rocker-type interior door lock. To lock a door when leaving your vehicle, press to the "Lock" position and close the door.
16 THINGS TO KNOW BEFORE STARTING YOUR VEHICLE
WARNING!
For personal security reasons and safety in an
accident, lock the vehicle doors when you drive as
well as when you park and leave the vehicle.
When leaving the vehicle always remove the key
from the ignition lock, and lock your vehicle. Do
not leave children unattended in the vehicle, or
with access to an unlocked vehicle. Unsupervised
use of vehicle equipment may cause severe per
sonal injuries and death.
OCCUPANT RESTRAINTS
Some of the most important safety features in your vehicle are the restraint systems. These include the front and rear seat belts for the driver and all passengers, and front airbags for both the driver and front passenger. If you will be carrying children too small for adult-size belts, your seat belts can also be used to hold infant and child restraint systems.
Please pay close attention to the information in this section. It tells you how to use your restraint system properly to keep you and your passengers as safe as possible.
WARNING!
In a collision, you and your passengers can suffer injuries, including fatalities, if you are not properly buckled up. You can strike the interior of your vehicle or other passengers, or you can be thrown out of the vehicle. Always be sure you and others in your vehicle are buckled up properly.
THINGS TO KNOW BEFORE STARTING YOUR VEHICLE 17
Buckle up even though you are an excellent driver, even on short trips. Someone on the road may be a poor driver and cause a collision that includes you. This can happen far away from home or on your own street.
Research has shown that seat belts save lives, and that they can reduce the seriousness of injuries in a collision. Some of the worst injuries happen when people are thrown from the vehicle. Seat belts reduce the possibility of ejection and the risk of injury caused by striking the inside of the vehicle. Everyone in a motor vehicle should be belted at all times to reduce or prevent injuries.
Lap/Shoulder Belts
The outboard front and rear seats of your vehicle are equipped with lap/shoulder belts.
The belt webbing retractor is designed to lock during very sudden stops or collisions. This feature allows the shoulder part of the belt to move freely with you under normal conditions. But in a collision, the belt will lock and reduce the risk of your striking the inside of the vehicle or being thrown out.
WARNING!
It is extremely dangerous to ride in a cargo area,
inside or outside of a vehicle. In a collision,
people riding in these areas are more likely to be
seriously injured or killed.
Do not allow people to ride in any area of your
vehicle that is not equipped with seats and seat
belts.
Be sure everyone in your vehicle is in a seat using
a seat belt properly.
18 THINGS TO KNOW BEFORE STARTING YOUR VEHICLE
WARNING!
Wearing a seat belt incorrectly is dangerous. Seat belts are designed to go around the large bones of your body. These are the strongest parts of your body and take the forces of a collision the best. Wearing your belt in the wrong place could make your injuries in a collision much worse. You might suffer internal injuries, or you could even slide out of part of the belt. Follow these instructions to wear your seat belt safely and to keep your passengers safe, too.
Two people should never be belted into a single seat belt. People belted together can crash into one another in an accident, hurting one another badly. Never use a lap/shoulder belt or a lap belt for more than one person, no matter what their size.
Lap/Shoulder Belt Operating Instructions
1. Enter the vehicle and close the door. Sit back and adjust the seat.
2. The seat belt latch plate is above the back of the front seat, next to your arm in the rear seat. Grasp the latch plate and pull out the belt. Slide the latch plate up the webbing as far as necessary to allow the belt to go around your lap.
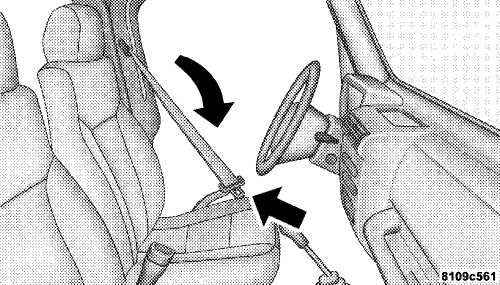
3. When the belt is long enough to fit, insert the latch plate into the buckle until you hear a "click."
THINGS TO KNOW BEFORE STARTING YOUR VEHICLE 19
WARNING!
A belt that is buckled into the wrong buckle will not protect you properly. The lap portion could ride too high on your body, possibly causing internal injuries. Always buckle your belt into the buckle nearest you.
A belt that is loose will not protect you as well. In a sudden stop you could move too far forward, increasing the possibility of injury. Wear your seat belt snugly.
A belt that is worn under your arm is very dangerous. Your body could strike the inside surfaces of the vehicle in a collision, increasing head and neck injury. A belt worn under the arm can cause internal injuries. Ribs aren’t as strong as shoulder bones. Wear the belt over your shoulder so that the strongest bones will take the force in a collision.
A shoulder belt placed behind will not protect you from injury during a collision. You are more likely to hit your head in a collision if you do not wear your shoulder belt. The lap and shoulder belt are meant to be used together.
4. Position the lap belt across your thighs, below your abdomen. To remove slack in the lap belt portion, pull up on the shoulder belt. To loosen the lap belt if it is too tight, tilt the latch plate and pull on the lap belt. A snug belt reduces the risk of sliding under the belt in a collision.
20 THINGS TO KNOW BEFORE STARTING YOUR VEHICLE

8109caf3
A lap belt worn too high can increase the risk of
internal injury in a collision. The belt forces won’t
be at the strong hip and pelvic bones, but across
your abdomen. Always wear the lap belt as low as
possible and keep it snug.
A twisted belt cannot do its job as well. In a
collision it could even cut into you. Be sure the
belt is straight. If you cannot straighten a belt in
your vehicle, take it to your dealer and have it
fixed.
WARNING!
Position the shoulder belt on your chest so that it is
comfortable and not resting on your neck. The retractor
will withdraw any slack in the belt.
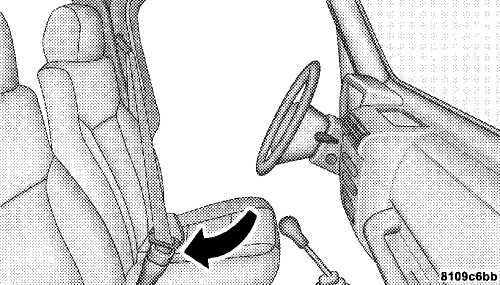
To release the belt, push the red button on the buckle.
The belt will automatically retract to its stowed position.
If necessary, slide the latch plate down the webbing to
allow the belt to retract fully.
A frayed or torn belt could rip apart in a collision and leave you with no protection. Inspect the belt system periodically, checking for cuts, frays, or loose parts. Damaged parts must be replaced immediately. Do not disassemble or modify the system. Seat belt assemblies must be replaced after a collision if they have been damaged (bent retractor, torn webbing, etc.).
THINGS TO KNOW BEFORE STARTING YOUR VEHICLE 21
Adjustable Upper Shoulder Belt Anchorage
In the front seats, the shoulder belt anchorage can be adjusted upward or downward to position the belt away from your neck. Push in on the anchorage near your outside shoulder and slide it up or down to reach the position that serves you best.
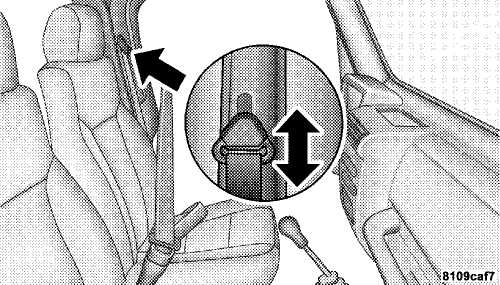
As a guide, if you are shorter than average, you will prefer a lower position, and if you are taller than average, you’ll prefer a higher position. When you release the anchorage, try to move it up or down to make sure that it is locked in position.
Seat Belts And Pregnant Women
We recommend that pregnant women use seat belts throughout their pregnancy. Keeping the mother safe is the best way to keep the baby safe.
Pregnant women should wear the lap part of the belt across the thighs and as snug across the hips as possible. Keep the belt low so that it does not come across the abdomen. That way the strong bones of the hips will take the force if there is a collision.
Seat Belt Extender
If a seat belt is too short, even when fully extended and when the adjustable upper shoulder belt anchorage (if equipped) is in its lowest position, your dealer can provide you with a seat belt extender. This extender should be used only if the existing belt is not long enough. When it is not required, remove the extender and store it.
22 THINGS TO KNOW BEFORE STARTING YOUR VEHICLE
WARNING!
Using a seat belt extender when not needed can increase the risk of injury in a collision. Only use when the seat belt is not long enough when it is worn low and snug, and in the recommended seating positions. Remove and stow the seat belt extender when not needed.
Driver And Front Passenger Supplemental Restraint Systems (SRS) — Airbags
AIRBAGS
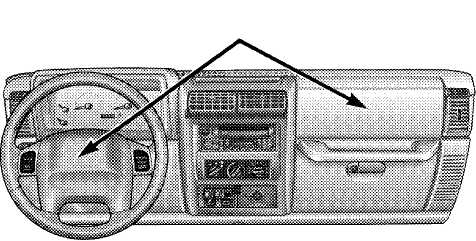
This vehicle has front airbags for both the driver and front passenger as a supplement to the seat belt restraint system. The driver’s front airbag is mounted in the center of the steering wheel. The passenger’s front airbag is mounted in the instrument panel, above the glove compartment. The words SRS/AIRBAG are embossed on the airbag covers.
NOTE: The front airbags are certified to the Federal regulations that allow less forceful deployment.
NOTE: Airbag covers may not be obvious in the interior trim; but they will open to allow airbag deployment.
WARNING!
Do not put anything on or around the front airbag covers or attempt to manually open them. You may damage the airbags and you could be injured because the airbags are not there to protect you. These protective covers for the airbag cushions are designed to open only when the airbags are inflating.
810aSd8e
THINGS TO KNOW BEFORE STARTING YOUR VEHICLE 23
Airbags inflate in moderate to high speed impacts. Along with the seat belts, front airbags work with the instrument panel knee bolsters to provide improved protection for the driver and front passenger.
The seat belts are designed to protect you in many types of collisions. The front airbags deploy in moderate to severe frontal collisions. But even in collisions where the airbags work, you need the seat belts to keep you in the right position for the airbags to protect you properly.
Here are some simple steps you can take to minimize the risk of harm from a deploying airbag.
1. Children 12 years old and under should always ride buckled up in a rear seat.
Infants in rear-facing child restraints (designed for children up to 20 lbs (9 kg) and at least one year old) should NEVER ride in the front seat of a vehicle with a passenger front airbag, unless the airbag is turned off. An airbag deployment can cause severe injury or death to infants in this position.
Children that are not big enough to properly wear the vehicle seat belt (Refer to "Child Restraint" in this section.) should be secured in the rear seat, in a child restraint or belt-positioning booster seat. Older children who do not use child restraints or belt-positioning booster seats should ride properly buckled up in the rear seat. Never allow children to slide the shoulder belt behind them or under their arm.
If a child from 1 to 12 years old must ride in the front passenger seat because the vehicle is crowded, move the seat as far back as possible, and use the proper child restraint. Refer to "Child Restraint" in this section.
You should read the instructions provided with your child restraint to make sure that you are using it properly.
All occupants should use their lap and shoulder belts
properly.
The driver and front passenger seats should be moved
back as far as practical to allow the front airbags room to
inflate.
24 THINGS TO KNOW BEFORE STARTING YOUR VEHICLE
WARNING!
Relying on the airbags alone could lead to more severe injuries in a collision. The airbags work with your seat belt to restrain you properly. In some collisions the airbags won’t deploy at all. Always wear your seat belts even though you have airbags.
Being too close to the steering wheel or instrument panel during airbag deployment could cause serious injury. Airbags need room to inflate. Sit back, comfortably extending your arms to reach the steering wheel or instrument panel.
Airbag System Components
The airbag system consists of the following:
Airbag Control Module (ACM)
Airbag Warning Light
Driver Airbag
Passenger Airbag
Steering Wheel And Column
Instrument Panel
Crash Sensor
Interconnecting Wiring
Knee Impact Bolsters
Passenger Airbag ON/OFF Switch (If Equipped)
How The Airbag System Works
The Airbag Control Module (ACM) determines if a
frontal collision is severe enough to require the airbags
to inflate.
The ACM will not detect side, roll over, or rear
impacts.
The ACM also monitors the readiness of the electronic
parts of the system whenever the ignition switch is in
the START or ON position. These include all of the
items listed above except the knee bolster, the instru
ment panel, and the steering wheel and column. If the
ignition key is in the OFF or ACC position, or not in
the ignition, the airbags are not on and will not inflate.
THINGS TO KNOW BEFORE STARTING YOUR VEHICLE 25
Also, the ACM turns on the "Airbag Warning Light" in the instrument panel for 6 to 8 seconds when the ignition is first turned on, then turns the light off. If it detects a malfunction in any part of the system, it turns on the light either momentarily or continuously. If theACM detects a malfunction, the "Airbag Warning Light" will illuminate for a minimum of 12 seconds and will remain illuminated as long as the malfunction exists.
WARNING!
Ignoring the "Airbag Warning Light" in your instrument panel could mean you won’t have the airbags to protect you in a collision. If the light does not come on, stays on after you start the vehicle, or if it comes on as you drive, have the airbag system checked right away.
The Driver and Passenger Airbagflnflator Units are
located in the center of the steering wheel and in the instrument panel. When the ACM detects a collision requiring the airbags, it signals the inflator units. A large quantity of nontoxic gas is generated to inflate the airbags. The airbag covers separate and fold out of the way as the bags inflate to full size. The bags fully inflate in about 50 milliseconds. This is about half of the time it takes to blink your eyes. The airbags then quickly deflate while helping to restrain the driver and front passenger. The driver’s front airbag gas is vented through the airbag material towards the instrument panel. The passenger’s front airbag gas is vented through vent holes in the sides of the airbag. In this way the airbags do not interfere with your control of the vehicle.
The Knee Impact Bolsters help protect the knees and position the driver and front passenger’s for the best interaction with the front airbag.
26 THINGS TO KNOW BEFORE STARTING YOUR VEHICLE
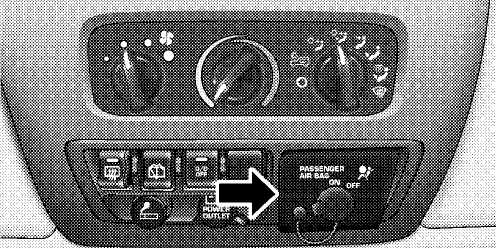
Passenger Airbag On/Off Switch — If Equipped
NOTE: The Passenger Airbag ON/OFF Switch is designed so that the switch position can be changed using the ignition key. The key inserts into the switch far enough to fully depress a spring-loaded locking plunger, and then rotates to the desired position. The key will not insert fully into the switch, and the spring-loaded locking plunger prevents the key from remaining in the switch.
The Passenger Airbag ON/OFF Switch is located on the instrument panel. The switch is to be turned off only if the passenger is an infant (less than 1 year old) or a child (age 1 to 12) who must ride in the front seat because there is no rear seat.
WARNING!
Whenever an airbag is turned off, even a lap/ shoulder belted passenger may hit their head, neck, or chest on the dashboard (instrument panel) or windshield in a crash. This may result in serious injury or death.
THINGS TO KNOW BEFORE STARTING YOUR VEHICLE 27
To Shut Off the Passenger Airbag
Turn ignition to OFF position.
Remove the water-resistant plug.
Place the ignition key in the Passenger Airbag ON/
OFF Switch, press inward and turn the key to the right to
the OFF position. This will shut off the passenger airbag.
Reinstall the water-resistant plug.
NOTE: When the Passenger Airbag ON/OFF Switch is in the OFF position, a indicator light will illuminate when the ignition is ON. If the indicator light does not illuminate for 3 seconds after the ignition is turned ON, or when the Passenger Airbag ON/OFF Switch is turned OFF (while ignition is in the ON position), have an authorized dealer service the system immediately.
To Turn On the Passenger Airbag
Turn ignition to OFF position.
Remove the water-resistant plug.
Place the ignition key in the Passenger Airbag ON/
OFF Switch, press inward and turn the key to the left to
the ON position. This will turn on the passenger airbag.
Reinstall the water-resistant plug.
NOTE: Do not turn the Passenger Airbag ON/OFF Switch on or off with the ignition in the ON/RUN or START positions, as the ACM could cause the "Airbag Warning Lamp" to illuminate.
If A Deployment Occurs
The airbag system is designed to deploy when the impact sensors detect a moderate-to-severe frontal collision, to help restrain the driver and right front passenger, and then to immediately deflate.
NOTE: A frontal collision that is not severe enough to need airbag protection will not activate the system. This does not mean something is wrong with the airbag system.
28 THINGS TO KNOW BEFORE STARTING YOUR VEHICLE
If you do have a collision which deploys the airbags, any or all of the following may occur:
• The nylon airbag material may sometimes cause abra
sions and/or skin reddening to the driver and front
passenger as the airbags deploy and unfold.
The abrasions are similar to friction rope burns or those you might get sliding along a carpet or gymnasium floor. They are not caused by contact with chemicals. They are not permanent and normally heal quickly. However, if you haven’t healed significantly within a few days, or if you have any blistering, see your doctor immediately.
• As the airbags deflate you may see some smoke-like
particles. The particles are a normal by-product of the
process that generates the nontoxic gas used for airbag
inflation. These airborne particles may irritate the skin,
eyes, nose, or throat. If you have skin or eye irritation,
rinse the area with cool water. For nose or throat
irritation, move to fresh air. If the irritation continues,
see your doctor.
If these particles settle on your clothing, follow the garment manufacturer’s instructions for cleaning.
It is not advisable to drive your vehicle after the airbags have deployed. If you are involved in another collision, the airbags will not be in place to protect you.
WARNING!
Deployed airbags cannot protect you in another collision. Have the airbags replaced by an authorized dealer as soon as possible.
THINGS TO KNOW BEFORE STARTING YOUR VEHICLE 29
Maintaining Your Airbag System
WARNING!
Modifications to any part of the airbag system
could cause it to fail when you need it. You could
be injured because the airbags are not there to
protect you. Do not modify the components or
wiring, including adding any kind of badges or
stickers to the steering wheel hub trim cover or
the upper right side of the instrument panel. Do
not modify the front bumper, vehicle body struc
ture, or frame.
You need proper knee impact protection in a
collision. Do not mount or locate any aftermarket
equipment on or behind the knee bolster.
It is dangerous to try to repair any part of the
airbag system yourself. Be sure to tell anyone who
works on your vehicle that it has airbags.
Airbag Warning Light
You will want to have the airbags ready to inflate for your protection in an collision. While the airbag system is designed to be maintenance free, if any of the following occurs, have an authorized dealer service the system immediately.
The "Airbag Warning Light" does not come on or
flickers during the 6 to 8 seconds when the ignition
switch is first turned on.
The "Airbag Warning Light" remains on or flickers
after the 6 to 8 second interval.
The "Airbag Warning Light" flickers or comes on and
remains on while driving.
Child Restraint
Everyone in your vehicle needs to be buckled up all the time-babies and children, too. Every state in the United States and all Canadian provinces require that small children ride in proper restraint systems. This is the law, and you can be prosecuted for ignoring it.
30 THINGS TO KNOW BEFORE STARTING YOUR VEHICLE
Children 12 years and under should ride properly buckled up in a rear seat, if available. According to crash statistics, children are safer when properly restrained in the rear seats rather than in the front.
WARNING!
In a collision, an unrestrained child, even a tiny baby, can become a missile inside the vehicle. The force required to hold even an infant on your lap can become so great that you could not hold the child, no matter how strong you are. The child and others could be badly injured. Any child riding in your vehicle should be in a proper restraint for the child’s size.
Infants and Small Children
There are different sizes and types of restraints for children from newborn size to the child almost large enough for an adult safety belt. Always check the child seat owner’s manual to ensure that you have the right seat for your child. Use the restraint that is correct for your child.
The rearward-facing infant carrier is for babies weigh
ing up to about 20 lbs (9 kg), and one year old or more.
The infant restraint must NEVER be used in the front
seat of a vehicle with a front passenger airbag unless
the airbag is turned off. An airbag deployment could
cause severe injury or death to infants in this position.
The infant carrier is held in the vehicle by the lap belt,
lap/shoulder belt, or the LATCH child restraint an
chorage system.
Children under one year of age should continue to ride
in a rear-facing infant seat, even if they weigh more
than 20 lbs (9 kg). A "convertible" child seat, one that
is designed to be used either rearward-facing or
forward-facing, should be used for children who are
too heavy for the infant carrier, but who are too young
to face forward in the vehicle.
The forward-facing child seat is for children from
about 20^0 lbs (9-18 kg), and more than one year old.
The child seat is held in the vehicle by the lap belt,
lap/shoulder belt, or the LATCH child restraint an
chorage system.