UNDERSTANDING THE FEATURES OF YOUR VEHICLE
CONTENTS
■ Mirrors 46
Inside Day/Night Mirror 46
Inside Automatic Dimming Compass/
Temperature Mirror — If Equipped 46
Compass Calibration 47
Outside Mirrors 49
■ Seats 50
Front Seat Adjustment 50
Front Seat Adjustment — Recline 50
Tilting Front Seats 51
Fold And Tumble Rear Seat 52
Removing The Rear Seat 53
□ Replacing The Rear Seat 54
I To Open And Close The Hood 55
I Lights 56
Interior Lights 56
Multi-Function Control Lever 56
Parking Lights, Instrument Panel Lights, And
Headlights 57
Lights-On Reminder 57
Headlight Dimmer Switch 57
Passing Light 57
Front Fog Lights — If Equipped 58
Turn Signals 58
44 UNDERSTANDING THE FEATURES OF YOUR VEHICLE H
□ Daytime Running Lights — Canada Only 58
■ Windshield Wipers And Washers 58
Intermittent Wiper System 58
Windshield Wiper Operation 59
Windshield Washers 59
Mist Feature 59
Tilt Steering Column 60
Electronic Speed Control 60
To Activate 61
To Set At A Desired Speed 61
To Deactivate 61
To Resume Speed 61
To Vary The Speed Setting 61
To Accelerate For Passing 62
■ Cigar Lighter And Ashtrays — If Equipped ... .62
I Electrical Power Outlet 63
□ Electrical Outlet Use With Engine Off 63
I Cup Holders 64
I Storage 65
Glove Compartment 65
Console Storage Compartment —
If Equipped 65
□ Add-A-Trunk™ — If Equipped 65
I Dual Top — If Equipped 66
Removing The Soft Top 66
Installing The Soft Top 68
I Hard Top 78
Hard Top Removal 79
Hard Top Installation 82
UNDERSTANDING THE FEATURES OF YOUR VEHICLE 45
I Soft Top 82 □ Door Frame Installation 101
Folding Down The Soft Top 84 ■ Folding Windshield 102
Putting Up The Soft Top 91 □ Lowering The Windshield And Removing
Sunrider™ — If Equipped (Unlimited Models
Only) 99 □ Raising The Windshield And Replacing
. „ „ 1n1 Side Bars 108
I Door Frame 101
□ Door Frame Removal 101
46 UNDERSTANDING THE FEATURES OF YOUR VEHICLE
MIRRORS
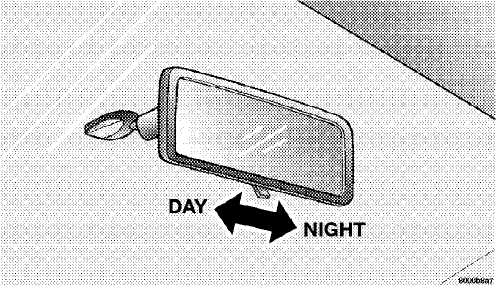
Inside Day/Night Mirror
The mirror should be adjusted to center on the view through the rear window. A two-point pivot system allows for horizontal and vertical adjustment of the
mirror.
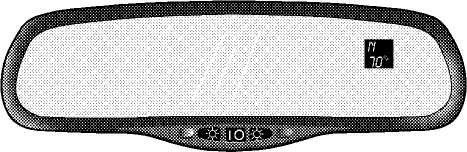
Inside Automatic Dimming Compass/Temperature Mirror — If Equipped
The automatic day/night mirror is equipped with three buttons: the left switch for the left LED lamp, the right switch for the right side LED lamp and the center switch for the compass/temperature function. Pressing the left and right switches simultaneously for more than 5seconds will turn the auto dim function on or off. If the feature is turned off, it will automatically turn back on with the next ignition cycle. A green light next to the right button will indicate when the dimming feature is activated active. The mirror also senses the backup lamp circuit, and will automatically disable its self-dimming feature whenever the transmission gear selector is in the R (Reverse) position.
Annoying headlight glare can be reduced by moving the small control under the mirror to the night position (toward rear of vehicle). The mirror should be adjusted while set in the day position (toward windshield).
UNDERSTANDING THE FEATURES OF YOUR VEHICLE 47
CAUTION!
To avoid damage to the mirror during cleaning, never spray any cleaning solution directly onto the mirror. Apply the solution onto a clean cloth and wipe the mirror clean.
The compass/temperature display provides the outside temperature and one of eight compass headings (N, NE, E, SE, S, SW, W, NW).
Each time the center button is pressed and released within 3 seconds, the display toggles through the following three configurations:
display compass/temperature (Fahrenheit),
display compass/temperature (Celsius),
and display off.
Compass Calibration
Automatic Calibration
Once calibrated, the compass has the ability to self-correct for changes in magnetic field to keep the compass accurate. This is referred to as Automatic Calibration. If magnetic field changes are too great, the compass will enter CAL mode on it’s own and manual calibration will be required. To recalibrate the compass, drive the vehicle at less than 5 mph (8 km/h) through up to IV2 360° turns in an area free from large metal objects or power lines. When the compass has been calibrated, the CAL symbol will turn off and the compass will function normally.
48 UNDERSTANDING THE FEATURES OF YOUR VEHICLE
When the vehicle is new, the compass should initially be verified for correct compass variance (refer to Compass Variation Adjustment) and calibrated manually (refer to Manual Calibration). This will ensure correct initial calibration and eliminate initial erroneous compass headings.
Manual Calibration
If the compass appears erratic and CAL does not appear, you must manually put the compass into the calibration mode. To ensure proper compass calibration, make sure the compass variance is properly set before manually calibrating the compass (refer to Compass Variation Adjustment).
To put the compass into calibration mode: Turn the ignition to the ON position. Press and hold the center button for more than 6 seconds until CAL (calibration mode) appears in the display. To change the display between VAR (compass variance) and CAL (compass calibration) modes. Release the button to invoke manual calibration mode. To recalibrate the compass, drive the vehicle at less than 5 mph (8 km/h) through up to CAL should display for a complete IV2 360° turns in an area
free from large metal objects or power lines. When the compass has been calibrated, the CAL symbol will turn off and the compass will function normally.
Compass Variation Adjustment
Compass Variance is the difference between magnetic north and geographic north. In some areas of the country, the difference between magnetic and geographic north is great enough to cause the compass to give false readings. If this occurs, the compass variance must be set according to the Compass Variance Map.
NOTE: When the mirror is in the VAR mode, the letter "Z" will be displayed along with the currently selected zone number.
UNDERSTANDING THE FEATURES OF YOUR VEHICLE 49

COMPASS VARIANCE MAP
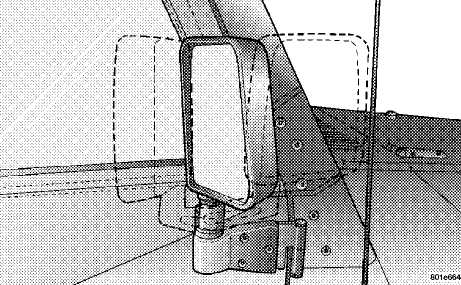
Outside Mirrors
To receive maximum benefit, adjust the outside mirror(s) to center on the adjacent lane of traffic with a slight overlap of the view obtained on the inside mirror.
50 UNDERSTANDING THE FEATURES OF YOUR VEHICLE
WARNING!
Vehicles and other objects seen in the right side convex mirror will look smaller and f arther away than they really are. Relying too much on your right side mirror could cause you to collide with another vehicle or other object.
Use your inside mirror when judging the size or distance of a vehicle seen in the right side mirror.
SEATS
WARNING!
Front Seat Adjustment
Move seat forward or rearward by lifting the lever. Be sure the latch engages fully.
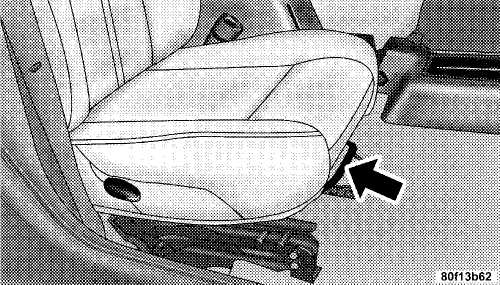
Adjusting a seat while the vehicle is moving is dangerous. The sudden movement of the seat could cause you to lose control. The seat belt might not be properly adjusted and you could be injured. Adjust any seat only while the vehicle is parked.
Front Seat Adjustment — Recline
To adjust seatback, lift lever, lean back, and release lever at desired position. To return seatback, lift the lever, lean forward and release the lever.