72 UNDERSTANDING THE FEATURES OF YOUR VEHICLE
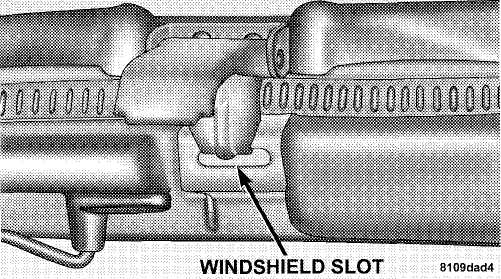
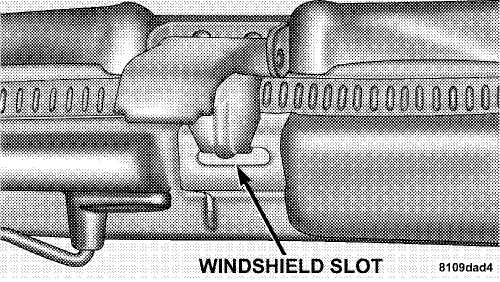
14. Open the header latches and engage the hooks on each side into the windshield slot.
NOTE: Do not latch at this time.
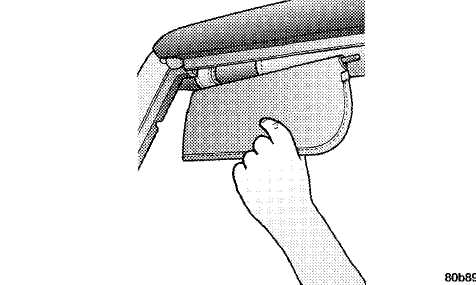
15. Grasp the drip rail retainers and untuck them from the door frame. The soft top fabric should cover the header completely from one side to the other. This may require you to pull some of the fabric down and around the corners. Repeat this step for the other side.
 DRIP
RAIL RETAINER
DRIP
RAIL RETAINER
NOTE: Do not tuck the drip rail retainers into the frame at this time.
UNDERSTANDING THE FEATURES OF YOUR VEHICLE 73
 16.
Move to the rear of the vehicle and gently pull
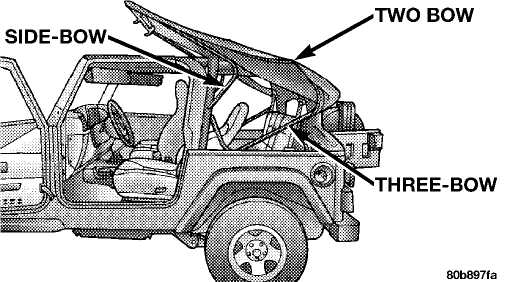
the sail panels over the 3 bow.
Let them hang down over the sport bar.
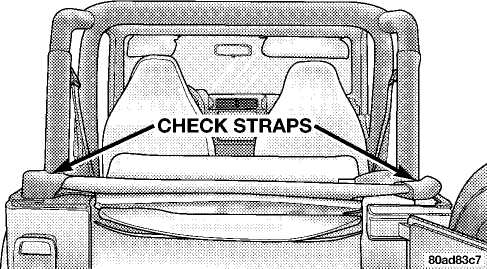
Make sure that the nylon check straps between the
2 bow and 3 bow
are not twisted or wrapped around the 2
bow.
16.
Move to the rear of the vehicle and gently pull
the sail panels over the 3 bow.
Let them hang down over the sport bar.
Make sure that the nylon check straps between the
2 bow and 3 bow
are not twisted or wrapped around the 2
bow.
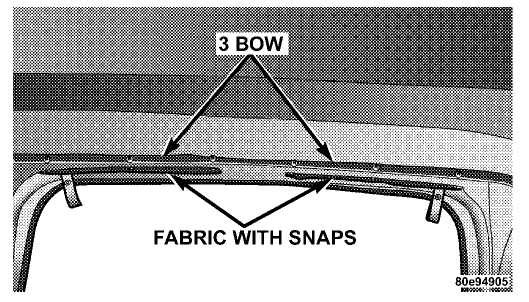
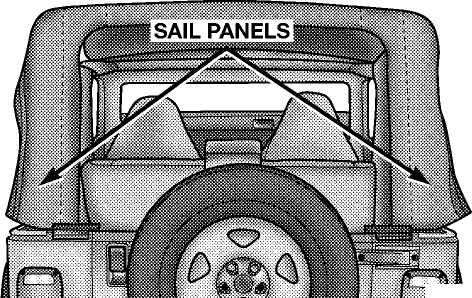
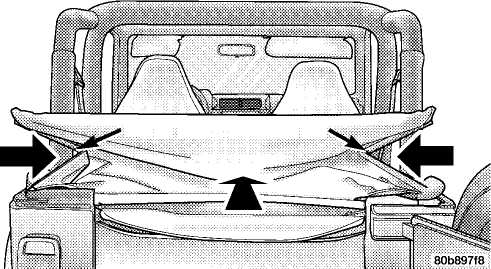
16. Move to the rear of the vehicle and gently pull the sail panels over the 3 bow. Let them hang down over the sport bar. Make sure that the nylon check straps between the 2 bow and 3 bow are not twisted or wrapped around the 2 bow.

NOTE: Do not tuck the sail panel retainers at this time.
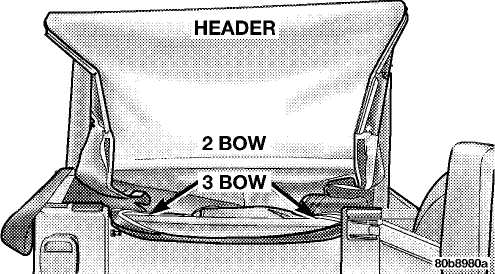
17. Fold the rear seat back and sit in the rear cargo area, facing rearward. Look up at the 2 bow. Wrap fabric around 2 bow attaching it with the Velcro®. Look up at the 3 bow and locate the 4 snaps on the rear side of the 3 bow. Grasp the fabric rearward of the 3 bow (fabric contains the snaps) and pull it up and around, attaching all 4 snaps. Return the rear seat to it’s original position.
74 UNDERSTANDING THE FEATURES OF YOUR VEHICLE

18.
Begin working from the rear tailgate opening and
align the sail panel retainer to the edge
of the body side retainer. Tuck the
retainer around the corner working from
back to front.
SAIL
PANEL
RETAINER
NOTE: This may be difficult to do the first time. The fabric will stretch after the soft top is installed in the up position.
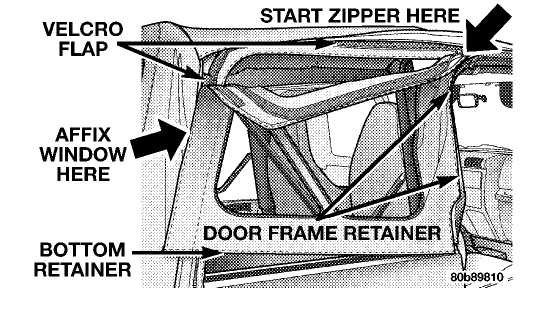
19. To install the quarter window, affix the rear corner of the quarter window temporarily to the Velcro® in the rear of the vehicle. Now, zip the zipper only about 1 inch (2.5 cm). At this time, it is necessary to tuck in the door frame retainer into the door frame. After the door frame retainer has been tucked in completely, remove the window from the Velcro® and finish zipping in the window. Tuck and fold the Velcro® flaps which are above and to the rear of the quarter windows. Repeat this step for the other side.
UNDERSTANDING THE FEATURES OF YOUR VEHICLE 75
20. Tuck in the bottom retainers on the quarter windows into the bodyside retainer, beginning from the rear and working to the front of the vehicle. Repeat this step for the other side.
21. Locate the black retainer bar that was set aside. Remove and discard the end caps. Slide the retainer bar over the receiver at the bottom inside, with the bulky seal away from you.
76 UNDERSTANDING THE FEATURES OF YOUR VEHICLE
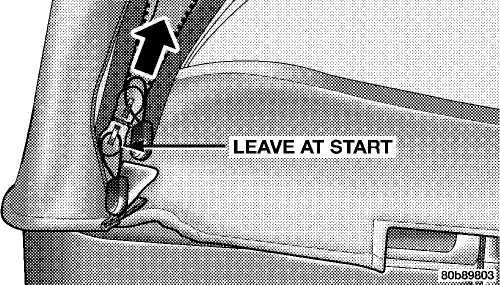
22. Zip the rear window beginning from the left using both zipper ends. Leave one zipper end at the start.
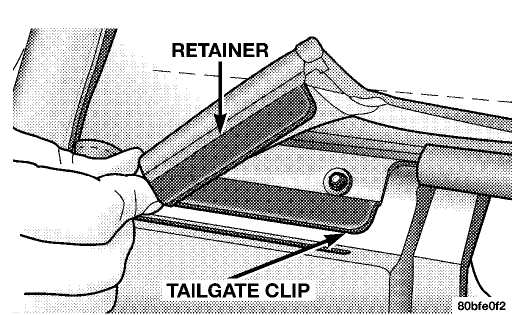
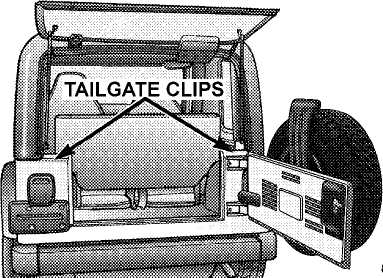
23. Tuck in the retainer bar ends into the tailgate clips on each side of the tailgate opening. 22
UNDERSTANDING THE FEATURES OF YOUR VEHICLE 77
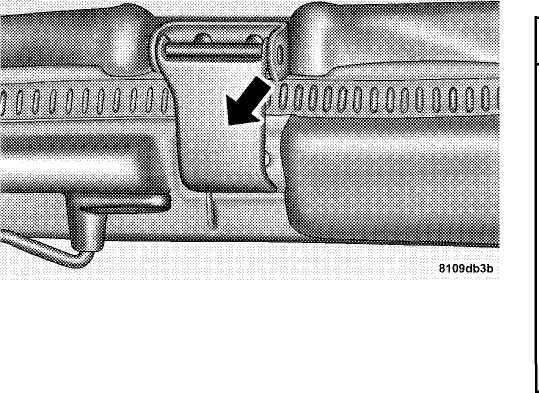
24.
Tuck in the plastic retainers on each side of the
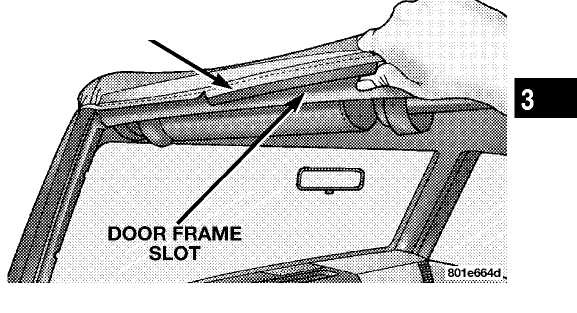
rear 25. Tuck in the drip rail
retainers into the rail slot,
window under the tailgate
clips. DRIP RAIL
RETAINER
78 UNDERSTANDING THE FEATURES OF YOUR VEHICLE ^^^^^^^^^╪ 26. Close the header latches and position the sun visor. HARD TOP
CAUTION!
The hard top is not designed to carry any additional loads such as roof racks, spare tires, building, hunting, or camping supplies, and/or luggage, etc. Also, it was not designed as a structural member of the vehicle, and thus cannot properly carry any additional loads other than environmental (rain, snow, etc.).
The hard top does not include any devices to properly secure any loads on the roof, and any damage (structural or surface finish) that occurs due to any additional loading to the top area will void the vehicle warranty.
UNDERSTANDING THE FEATURES OF YOUR VEHICLE 79
CAUTION!
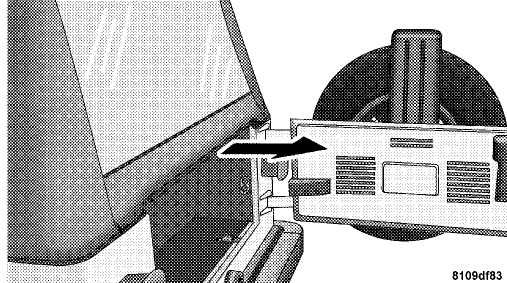
3. Unbolt the six Torx® head screws which secure the hard top to the vehicle using a #40 Torx® head driver.
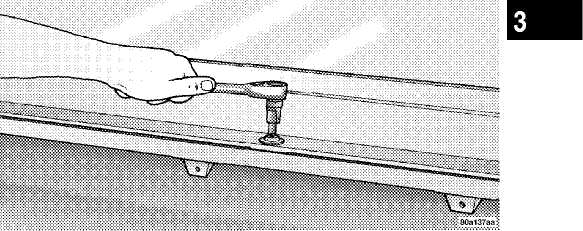
Do
not move your vehicle until the top has been either fully attached
to the windshield frame and bodyside, or fully removed.
 Hard
Top Removal
Hard
Top Removal
WINDSHIELD SLOT
Unlatch
the two hard top latches located at the top of
the windshield.
CAUTION!
When
removing the 2 front screws just rearward
of the doors, make sure that the nut does
not fall into the seat belt retractor.
Grasp the nut to prevent this from occurring.
80 UNDERSTANDING THE FEATURES OF YOUR VEHICLE
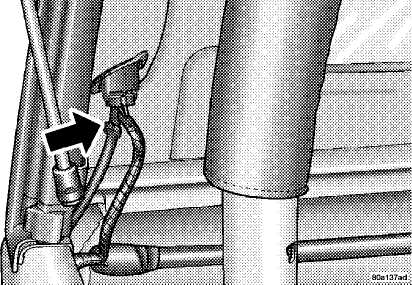
NOTE:
On a dual top vehicle, the two rear and center 6.
Locate the wiring harness at the rear left
side corner of
nuts are retained onto
the bodyside. the
vehicle.
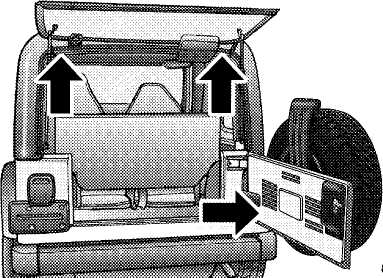
 Open
both doors.
Open
both doors.
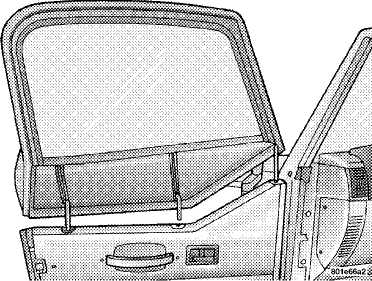
Open
tailgate all the way to ensure clearance of the
rear window
glass. Lift rear window glass.
UNDERSTANDING THE FEATURES OF YOUR VEHICLE 81
 7.
Disconnect the washer hose and install the
tethered cap.
7.
Disconnect the washer hose and install the
tethered cap.
CAUTION!
Make sure storage cap is installed to prevent foreign materials from entering tube and clogging system.
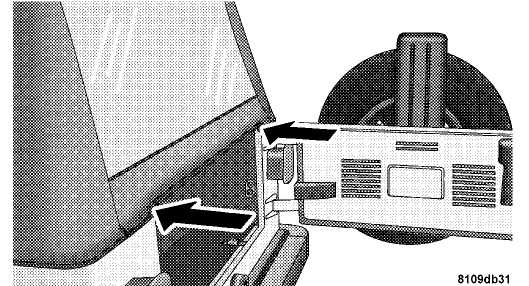
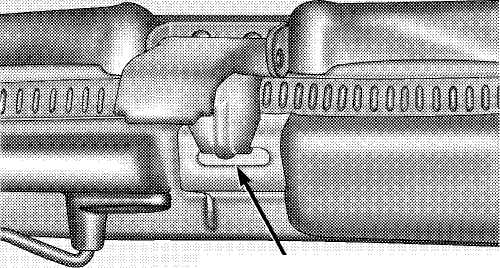
8. Disconnect the wire harness from the hard top by pressing the tab at the side of the connector and pulling to disconnect.
NOTE: If the red latch on the connector is locked, push the red latch to the right until you can only see the latch on one end (right) of the connector. This will unlock connector tab, allowing the tab to be pressed down and enabling the harness to be disconnected from the hard top.
9. Remove the hard top from the vehicle.
10. Fold
the harness back and secure it to the main
harness
using the attached Velcro®
strap, to prevent the
harness from
rattling.
82 UNDERSTANDING THE FEATURES OF YOUR VEHICLE
 NOTE:
If
the doors are to be removed, pull the #4
fuse
from
the fuse block to prevent dome lamp illumination.
NOTE:
If
the doors are to be removed, pull the #4
fuse
from
the fuse block to prevent dome lamp illumination.
Hard Top Installation
NOTE: If the door frames are installed from soft top usage, they must be removed prior to installation of the hard top.
Inspect
the hard top seals for damage and replace if
necessary.
Install
the hard top using the same steps for removal
in reverse order.
NOTE: The hard top must be positioned properly to ensure sealing. Set the hard top on the windshield frame so that there is no overhang. Also, make sure that the hard top is sitting flush with the body at the sides and check to ensure that there is a uniform gap between the lift glass and hard top.
SOFT TOP
CAUTION!
The
soft top is not designed to carry any addi
tional loads
such as roof racks, spare tires, build
ing, hunting, or
camping supplies, and/or lug
gage, etc. Also, it was not
designed as a structural
member of the vehicle, and thus cannot
properly
carry any additional loads other than environmen
tal
(rain, snow, etc.).
The soft top does not include any devices
to
properly secure any loads on the roof, and any
damage
(structural or surface finish) that occurs
due to any additional
loading to the top area will
void any vehicle warranty.
UNDERSTANDING THE FEATURES OF YOUR VEHICLE 83
 If
the temperature is below 72°F (24°C) and/or the top has been
folded down for a period of time, the top will appear to have shrunk
when you raise it, making it difficult to put up. This is caused by
a natural contraction of the vinyl coating on the fabric top.
If
the temperature is below 72°F (24°C) and/or the top has been
folded down for a period of time, the top will appear to have shrunk
when you raise it, making it difficult to put up. This is caused by
a natural contraction of the vinyl coating on the fabric top.
Place the vehicle in a warm area. Pull steadily on the top fabric. The vinyl will stretch back to its original size and the top can then be snapped into place. If temperature is 41°F (5°C) or below, do not attempt to put the top down or roll the rear or side curtains.
CAUTION!
Do
not run a fabric top through an automatic car
wash. Window
scratches and wax build up may
result.
Do not lower the top when the temperature
is
below 41°F (5°C). Damage to the top may result.
Do not lower the top when the windows are
dirty.
Grit may scratch the window.
Do not move your vehicle until the top has
been
either fully attached to the windshield frame, or
fully
lowered.
Do not lower the top with the windows
installed.
Window and top damage may occur.
Refer to "Appearance
Care for Fabric Top Mod
els"
in Section 7 of this manual. It
contains
important information on
cleaning and caring for
your vehicle’s
fabric top.
84 UNDERSTANDING THE FEATURES OF YOUR VEHICLE
WARNING!
Do
not drive vehicle with rear window curtain up
unless side
curtains are also open. Dangerous
exhaust gases which can kill
could enter the
vehicle.
The fabric upper doors and fabric top are
de
signed only for protection against the elements.
Do
not rely on them to contain occupants within
the vehicle or to
protect against injury during an
accident. Remember, always wear
seat belts.
Folding Down The Soft Top
1. If your vehicle has half doors, remove each half door window by opening the door and lifting the half door window out.
NOTE: Stow half doors carefully outside of the vehicle, never inside to avoid scratches.
UNDERSTANDING THE FEATURES OF YOUR VEHICLE 85
2. Grasp the drip rail retainers and untuck both of them 4. Release the header latches and leave the hooks in the from the door frame slot. Repeat this on the other side. windshield slots.
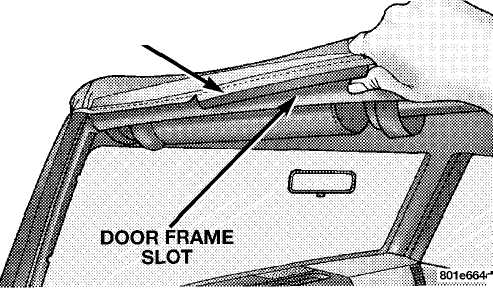

DRIP RAIL RETAINER
3. Unclip and move the sun visor to the side.
86 UNDERSTANDING THE FEATURES OF YOUR VEHICLE
5. Open the tailgate, partially unzip the rear window on each side, and unlock the rear window retainers.
NOTE: If zippers are difficult to operate due to road dust, etc., clean them with a mild soap solution and a small brush. Cleaning products are available through Mopar® distributors.
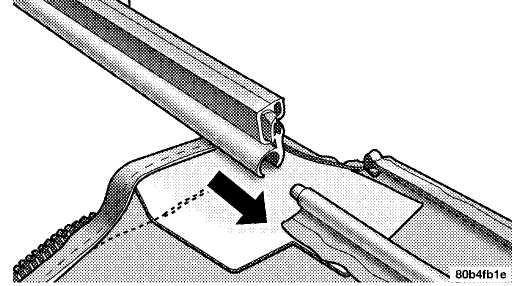
6. Pull the retainer bar straight out from the tailgate clips.
Remove the rear window entirely. This is done by unzipping the window bringing the right zipper tab all the way to the end of the zipper track at the bottom left corner. Stow the windows carefully to avoid scratching, pull up on the window to disengage zipper end.
UNDERSTANDING THE FEATURES OF YOUR VEHICLE 87
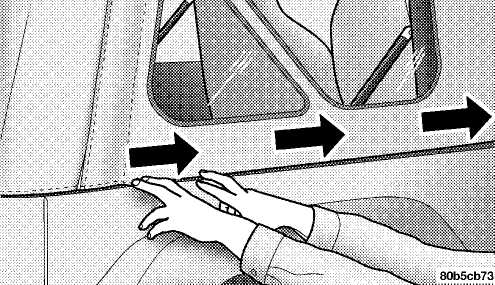
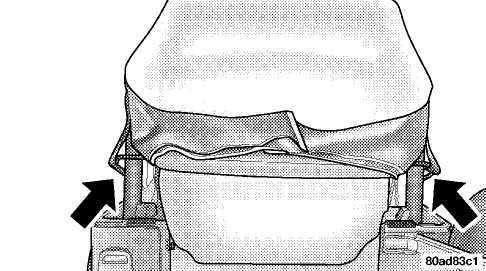
7. Beginning from the rear, moving forward, partially 8. Finish unzipping the window and repeat this step on unzip the side window and untuck the bottom retainers. the other side.
 BOTTOM
RETAINER NOTE: Stow clean windows carefully outside of the
BOTTOM
RETAINER NOTE: Stow clean windows carefully outside of the
vehicle to avoid scratches.
80b4fb1b
9. Untuck the sail panels from the bodyside.
88 UNDERSTANDING THE FEATURES OF YOUR VEHICLE
Remove
Sunrider™ pins to release side rails from
brackets located
on both door rails (Unlimited Models
Only).
Release
the hook portion of the latches. Grasp the
side bow behind the
header and lift the top back.

12. As you begin to lower the top, wrap the sail panels so that they rest on the roof of the vehicle.
NOTE: If your vehicle is equipped with a Dual Top, ensure that the hard top wire harness is folded back and secured to the main harness, using the attached Velcro® strap, to prevent connector damage.
13. Make sure the sides of the top are folded inward as the top continues to fold, and that the check straps are clear of the vehicle.
UNDERSTANDING THE FEATURES OF YOUR VEHICLE 89
Tuck the top between the 2 bow and the 3 bow as it folds. 14. Tuck the top between the 2 bow and the header.

90 UNDERSTANDING THE FEATURES OF YOUR VEHICLE
15. After the top is folded down, ensure that the drip rail retainers are tucked in inward as shown. This is to avoid unnecessary wear to the fabric.
16. After the top is folded down, the check straps must be wrapped around the header. This will keep them from hanging and flapping outside the vehicle.
DRIP RAIL RETAINER
UNDERSTANDING THE FEATURES OF YOUR VEHICLE 91
Putting Up The Soft Top
NOTE: Be sure the wire harness is not attached to the soft top bows before you lift the top.
Slide
Sunrider sleeve towards header to cover Sun-
rider link
(Unlimited Models Only).
Begin
working from the rear of the vehicle, with the
tailgate
open. Lift the plastic header (with latches) up and
over
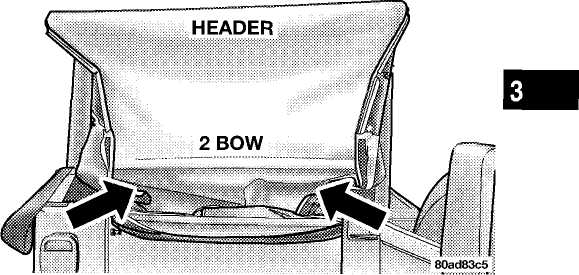
the sport bar. As the header reaches the top, locate
the
2 bow and push it up and over the sport
bar.
3. Move to the side of the vehicle and pull the side bow forward and down. Be sure the check straps are not tangled around the 2 bow. You will see the 3 bow rise from the rear of the vehicle.
92 UNDERSTANDING THE FEATURES OF YOUR VEHICLE
4. Unclip and move the sun visor to the side.
5. Open the header latches and engage the hook on each side into the windshield slot.