UNDERSTANDING YOUR INSTRUMENT PANEL
5 seconds after pressing the SET button, the station will continue to play, but will not be locked into push-button memory.
You may add a second FM station to each push button by repeating the above procedure with this exception: Press the SET button twice and SET 2 will appear in the radio display window. Each button can be set for SET 1 and SET 2 in the FM mode. This allows for 10 FM stations to be locked into push button memory. The stations stored in SET 2 memory can be selected by pressing the push button twice.
When you are receiving the MW or LW station that you wish to commit to push-button memory, press SET 1 button. SET 1 will appear in the radio display window. Select the push-button you wish to lock on this station and press and release that button.
Operating Instructions - RDS Mode
The following RDS functions can be selected while in radio mode by pushing the appropriate button.
Time Button
Briefly press the Time button to change the display between radio frequency and time.
To set the "HOME CLK" use a ballpoint pen or similar object to press the hour (H) or minute (M) buttons on the radio, The time setting will increase each time you press the button. Press any other button to exit from the clock setting mode.
Any time the hour (H) or minute (M) buttons are pressed when in the "RDS CLK" mode the clock will automatically switch to the "HOME CLK" mode and only the home time will be set.
Pressing and holding the TIME button for 2 seconds will toggle the clock between "RDS CLK" and "HOME CLK". The display will indicate which clock is activated. The "RDS CLK" is only updated by the signal transmitted from a radio station with an RDS signal.
╥└ (Traffic Announcement) Button
Pressing the ╥└ button will enable the Traffic Information system. If the current station does not have the TP function or is not a RDS station the radio will beep and display "NO ╥└" and then go into the ╥└ seek mode. During Tape/CD mode the ╥└ will give priority to traffic announcements from the last tuned ╥└ station. ╥└ mode is always off in the MW/LW mode.
During ╥└ seek mode the radio display will flash "╥└ SEEK". If no TP station is found after one cycle of the search the radio will display "NO ╥└" and then turn the ╥└ feature off.
PTY (Program Type) Button
• Pressing this button once will turn on the PTY mode for 10 seconds. If no action is taken during the 10 second time out the PTY icon will turn off. Pressing the PTY button within 10 seconds will allow the program format type to be selected. Toggle the PTY button to select the following format types:
None
Affairs
UNDERSTANDING YOUR INSTRUMENT PANEL
Children
Classics
Country
Culture
Document
Drama
Easy M
Educate
Finance
FolkM
Info
Jazz
Leisure
Light M
Nation M
News
126 UNDERSTANDING YOUR INSTRUMENT PANEL
Oldies
Other M
Phone In
PopM
Religion
RockM
Science
Social
Sport
Travel
Varied
Weather
By pressing the SEEK button when the PTY icon is displayed, the radio will be tuned to the next frequency station with the same selected PTY name. The PTY function only operates when in the FM mode.
If a preset button is activated while in the PTY (Program Type) mode, the PTY mode will be exited and the radio will tune to the preset station.
AF LOC (Alternative Frequencies and Local Frequencies) Button
Pressing the AF LOC button will toggle the radio display as follows: LOC ON »» AF OFF »» LOC OFF. The radio display will indicate when the LOC and AF are activated.
AF will automatically tune to another frequency of the same national program when the signal quality of the currently tuned frequency becomes poor.
LOC limits AF to only tune to another station within the same region code to ensure the program remains local.
Operating Instructions - Tape Mode
Insert the cassette with the exposed tape side toward the right and the mechanical action of the player will gently pull the cassette into the play position.
UNDERSTANDING YOUR INSTRUMENT PANEL
NOTE: When subjected to extremely cold temperatures, the tape mechanism may require a few minutes to warm up for proper operation. Sometimes poor playback may be experienced due to a defective cassette tape. Clean and demagnetize the tape heads at least twice a year.
Changing Tape Direction
Press the top of the PTY button to change tape play direction. The display will confirm the selected tape play direction. The time is always displayed.
Seek Button
Press the SEEK button up for the next selection on the tape and down to return to the beginning of the current selection.
Press the SEEK button up or down to move the track number to skip forward or backward 1 to 7 selections. Press the SEEK button once to move 1 selection, twice to move 2 selections, etc. the display will show the total number of times the SEEK button was pushed. The SEEK function will be cancelled by pressing either the FF/RW or FM/MW/LW button.
Fast Forward (FF)
Press the FF button up momentarily to advance the tape in the direction that it is playing. The tape will advance until the button is pressed again or the end of the tape is reached. At the end of the tape, the tape will play in the opposite direction.
Rewind (RW)
Press the RW button down momentarily to reverse the tape direction. The tape will reverse until the button is pressed again or until the end of the tape is reached. At the end of the tape, the tape will play in the opposite direction.
Tape Eject ─
Press the Eject Tape button and the cassette will disengage and eject from the radio.
Metal Tape Selection (70ms)
If a standard 70 u (metal) tape is inserted into the player, the player will automatically select the correct equalization.
128 UNDERSTANDING YOUR INSTRUMENT PANEL
Pinch Roller Release
If ignition power or the radio ON/OFF switch are turned off, the pinch roller will automatically retract to protect the tape from any damage. When power is restored to the tape player, the pinch roller will automatically reengage and the tape will resume play.
Dolby Noise Reduction
├1├1 The Dolby Noise Reduction System* is on when-4^»l ever the tape player is on, but may be switched on/off.
To turn the Dolby Noise reduction System on/off: Press the Dolby NR button (button 2) after you insert the tape. The NR light in the display will go off when the Dolby System is off.
* "Dolby" noise reduction manufactured under license from Dolby Laboratories Licensing Corporation. Dolby and the double-D symbol are trademarks of Dolby Laboratories Licensing Corporation.
Operation Instructions — CD Player
NOTE: The ignition switch must be in the ON or ACC position and the volume control ON before the CD player will operate.
Inserting The Compact Disc
You may either insert or eject a disc with the radio OFF.
If you insert a disc with the ignition ON and the radio OFF, the time of day will be displayed.
If the volume control is ON, the unit will switch from radio to CD mode and begin to play when you insert the disc. The display will show the track number and index time in minutes and seconds. Play will begin at the start of track 1.
Seek Button
Press the top of the SEEK button for the next selection on the CD. Press the bottom of the button to return to the beginning of the current selection, or return to the beginning of the previous selection if the CD is within the first 10 seconds of the current selection.
UNDERSTANDING YOUR INSTRUMENT PANEL 129
EJT CD (Eject) Button
Press the EJT CD button and the disc will unload and move to the entrance for easy removal. The unit will switch to the radio mode. If you do not remove the disc within 15 seconds, it will be reloaded, and the display will remain unchanged in whatever mode it is in.
FF/TUNE/RW Button
Press FF (Fast Forward) and the CD player will begin to fast forward until FF is released. The RW ( Reverse) button works in a similar manner.
Program Button 4 (Random Play)
Press this button while the CD is playing to activate Random Play. This feature plays the selections on the compact disc in random order to provide an interesting change of pace.
Press the SEEK button to move to the next randomly selected track.
Press button 4 a second time to stop Random Play.
CD/CD—C/Tape Button
Press this button to select between CD player, Remote CD changer, and Tape player.
Time Button
Press this button to change the display from elapsed CD playing time to time of day.
130 UNDERSTANDING YOUR INSTRUMENT PANEL
SALES CODE RBB—AM/FM STEREO RADIO WITH CASSETTE TAPE PLAYER AND CD CHANGER CAPABILITY
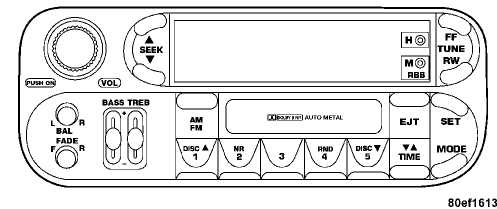
Operating Instructions
NOTE: Power to operate the radio is supplied through the ignition switch. It must be in the ON or ACC position to operate the radio.
NOTE: When first learning the control functions, the
user should set the controls as shown in the following
list.
Tone Controls...As illustrated.
Speaker Control...Centered.
Power Button
The volume control/power button pops out when pressed, this turns the sound system ON in the mode last used. Pushing the button back in turns the sound system OFF.
Electronic Volume Control
The electronic volume control turns continuously (360 degrees) in either direction without stopping. Turning the volume control to the right increases the volume and to the left decreases it.
When the audio system is turned on, the sound will be set at the same volume level as last played.
For your convenience, the volume can be turned down, but not up, when the audio system is off and the ignition is ON.
Seek
Press and release the SEEK button to search for the next station in either the AM or FM mode. Press the top of the button to seek up and the bottom to seek down. The radio will remain tuned to the new station until you
UNDERSTANDING YOUR INSTRUMENT PANEL 131
make another selection. Holding the button will bypass stations without stopping until you release it.
Tune
Press the TUNE control up or down to increase or decrease the frequency. If the button is pushed and held, the radio will continue to tune until the button is released. The frequency will be displayed and continuously updated while the button is pushed.
To Set The Push-Button Memory
When you are receiving a station that you wish to commit to push-button memory, press the SET button. The symbol SET 1 will now show in the display window. Select the "1-5" button you wish to lock onto this station and press and release that button. If a button is not selected within 5 seconds after pressing the SET button, the station will continue to play but will not be locked into push-button memory.
You may add a second station to each push-button by repeating the above procedure with this exception: Press the SET button twice and SET 2 will show in the display window. Each button can be set for SET 1 and SET 2 in both AM and FM. This allows a total of 10 AM and 10 FM
stations to be locked into push-button memory. The stations stored in SET 2 memory can be selected by pressing the push-button twice.
Every time a preset button is used a corresponding button number will be displayed.
Balance
The balance control adjusts the left-to-right speaker balance. Press the BAL button in and it will pop out. Adjust the balance and push the button back in.
Fade
The fade control provides for balance between the front and rear speakers. Press the FADE button in and it will pop out. Adjust the balance and push the button back in.
Bass and Treble Tone Control
The tone controls consist of 2 separate bands. The bass band is on the left, and the treble band is on the right. Each band is adjusted by a slider control with a detent at the mid-position. Moving the control up or down increases or decreases amplification of that band. The mid position provides a balanced output.
132 UNDERSTANDING YOUR INSTRUMENT PANEL
AM/FM Selection
Press the AM/FM button to change from AM to FM. The operating mode will be displayed next to the station frequency. The display will show ST when a stereo station is received in the FM mode.
Mode Button
Press the MODE button to select between the cassette tape player, CD changer, or the Satellite Radio (if equipped). When the Satellite Radio (if equipped) is selected "SA" will appear in your radio display.
A CD or tape may remain in the player while in the Satellite or radio mode.
Cassette Player Features
With ignition OFF and the sound system OFF, you can eject the tape cassette by pushing the EJECT button.
You can turn the tape player ON by inserting a cassette or activating the MODE button (with a cassette in the radio), but only when the ignition and radio are on.
Each time a cassette is inserted the tape player will begin playing on the side of the cassette that is facing up in the player.
Music Search
Pressing the SEEK button while playing a tape will start the Music Search mode. Press the SEEK button up for the next selection on the tape and down to return to the beginning of the current selection, or return to the beginning of the previous selection if the tape is within the first 5 seconds of the current selection.
The SEEK symbol appears on the display when Music Search is in operation. Music Search shuts off automatically when a selection has been located.
Selective Music Search
Press the SEEK button up or down to move the track number to skip forward or backward 1 to 7 selections. Press the SEEK button once to move 1 selection, twice to move 2 selections, etc.
Fast Forward And Rewind Buttons
Pressing the TUNE button up or down momentarily activates Fast Forward or Rewind and makes the directional arrows appear on the display.
To stop Fast Forward or Rewind, press the TUNE button again.
UNDERSTANDING YOUR INSTRUMENT PANEL 133
Time Button
Press the time button to toggle between station frequency and time of day.
Pressing this button while playing a cassette tape will change the side of the tape being played.
NR (Noise Reduction)
Pushing the Number 2 Pre-set button when a tape is playing deactivates the Dolby Noise Reduction System*. When Dolby is ON, the NR symbol appears on the display. Each time a tape is inserted the Dolby will turn ON.
* "Dolby" noise reduction manufactured under license from Dolby Laboratories Licensing Corporation. Dolby and the double-D symbol are trademarks of Dolby Laboratories Licensing Corporation.
CD Changer Control Capability — If Equipped
This radio is compatible with a remote mounted CD changer available through Mopar Accessories. The following instructions are for the radio controls that operate this CD changer.
Mode Button
To activate the CD changer, press the MODE button until CD information appears on the display.
Push-Button
While the CD changer is playing, press the NUMBER 1 push-button or the NUMBER 5 push-button to select a disc numbered higher or lower than the one currently being played.
Seek Button
Press the SEEK up or down to select another track on the same disc. A SEEK symbol will appear on the display.
Fast Forward And Rewind Buttons
Press and hold the FF button for fast forward. Press and hold the RW button for fast reverse.
The audio output can be heard when fast forward and fast reverse are activated.
Random Play (RND)
Press the Random button to play the tracks on the selected disc in random order for an interesting change of pace.
134 UNDERSTANDING YOUR INSTRUMENT PANEL
Random can be cancelled by pressing the button a second time or by ejecting the CD from the changer.
CD Diagnostic Indicators
When driving over a very rough road, the CD player may skip momentarily. Skipping will not damage the disc or the player, and play will resume automatically.
As a safeguard and to protect your CD player, one of the following warning symbols may appear on your display.
A CD HOT symbol indicates the player is too hot.
CD HOT will pause the operation. Play can be resumed when the operating temperature is corrected or another MODE is selected.
An ERR symbol will appear on the display if the laser is unable to read the Disc data for the following reasons:
Excessive vibration
Disc inserted upside down
Damaged disc
Water condensation on optics
Radio Display Messages
Your radio has been designed to display certain messages when a problem is detected with the CD player.
|
DISPLAY |
EXPLANATION |
WHAT TO DO |
|
E-Di |
Deadlock problem |
See your dealer for service |
|
E-GE |
Disc eject problem |
See your dealer for service |
|
┼-╧┴ |
Elevator problem |
See your dealer for service |
|
E-Dl |
Magazine eject problem |
Check that magazine is 0K-if not see your dealer for service |
|
DO CD _ |
╞╚╠ ^1 l^^lo^ 9(3 ╬ V |
No discs in magazine. Load discs in magazine. |
|
ř╬° ó DO SBHK ╣╚╟╩ |
ahotJBia» |
Player overheating. Allow to cool down. |
|
|
|
805«2ab6 |
UNDERSTANDING YOUR INSTRUMENT PANEL 135
SALES CODE RBK—AM/ FM STEREO RADIO WITH CD PLAYER AND CD CHANGER CONTROLS
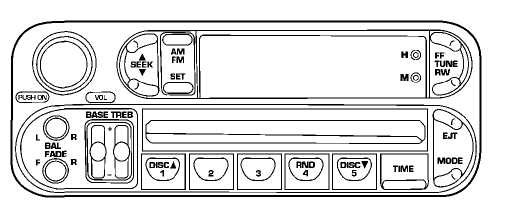
Radio Operation
Power/Volume Control
Press the ON/VOL control to turn the radio on. Turn the volume control clockwise to increase the volume.
NOTE: Power to operate the radio is supplied through the ignition switch. It must be in the ON or ACC position to operate the radio.
Seek
Press and release the SEEK button to search for the next station in either the AM or FM mode. Press the top of the button to seek up and the bottom to seek down. The radio will remain tuned to the new station until you make another selection. Holding the button in will bypass stations without stopping until you release it.
Tune
Press the TUNE control up or down to increase or decrease the frequency. If you press and hold the button, the radio will continue to tune until you release the button. The frequency will be displayed and continuously updated while the button is pressed.
Balance
The Balance control adjusts the left-to-right speaker balance. Press the BAL button in and it will pop out. Adjust the balance and push the button back in.
Fade
The Fade control provides for balance between the front and rear speakers. Press the FADE button in and it will pop out. Adjust the balance and push the button back in.
136 UNDERSTANDING YOUR INSTRUMENT PANEL
Bass and Treble Tone Control
The tone controls consist of 2 separate bands. The bass band is on the left, and the treble band is on the right. Each band is adjusted by a slider control with a detent at the mid-position. Moving the control up or down increases or decreases amplification of that band. The mid position provides a balanced output.
AM/FM Selection
Press the AM/FM button to change from AM to FM. The operating mode will be displayed next to the station frequency. The display will show ST when a stereo station is received.
To Set The Radio Push-Button Memory
When you are receiving a station that you wish to commit to push-button memory, press the SET button. SET 1 will show in the display window. Select the "1-5" button you wish to lock onto this station and press and release that button. If a button is not selected within 5 seconds after pressing the SET button, the station will continue to play but will not be locked into push-button memory.
You may add a second station to each push-button by repeating the above procedure with this exception: Press the SET button twice and SET 2 will show in the display window. Each button can be set for SET 1 and SET 2 in both AM and FM. This allows a total of 10 AM and 10 FM stations to be locked into push-button memory. The stations stored in SET 2 memory can be selected by pressing the push-button twice. Every time a preset button is used a corresponding button number will be displayed.
Time
Press the TIME button to change the display between radio frequency and time.
General Information
This radio complies with Part 15 of FCC rules and with RSS-210 of Industry Canada. Operation is subject to the following conditions:
This device may not cause harmful interference,
This
device must accept any interference received,
including
interference that may cause undesired opera
tion.
UNDERSTANDING YOUR INSTRUMENT PANEL
NOTE: Changes or modifications not expressively approved by the party responsible for compliance could void the user’s authority to operate the equipment.
CD Player Operation
NOTE: The ignition switch must be in the ON or ACC position and the volume control ON before the CD player will operate.
Inserting The Compact Disc
 CAUTION!
This
CD player will accept 4 % inch (12
cm) discs only. The use
of other sized discs may damage the CD
player mechanism.
You
may either insert or eject a disc with the radio OFF.
If you insert a disc with the ignition ON and the radio OFF, the display will show the time of day.
If the power is ON, the unit will switch from radio to CD mode and begin to play when you insert the disc. The display will show the track number and index time in minutes and seconds. Play will begin at the start of track one.
Seek
Press the top of the SEEK button for the next selection on the CD. Press the bottom of the button to return to the beginning of the current selection, or return to the beginning of the previous selection if the CD is within the first second of the current selection.
EJT — Eject
Press the EJT button and the disc will unload and move to the entrance for easy removal. The unit will switch to the radio mode.
If you do not remove the disc within 15 seconds, it will be reloaded. The unit will continue in radio mode.
The disc can be ejected with the radio and ignition OFF.
138 UNDERSTANDING YOUR INSTRUMENT PANEL
FF/TUNE/RW
Press FF (Fast Forward) and the CD player will begin to fast forward until FF is released. The RW ( Reverse) button works in a similar manner.
Random Play — RND/Program Button 4
Press the RND (button 4) button while the CD is playing to activate Random Play. This feature plays the tracks on the selected disc in random order to provide an interesting change of pace.
Press the SEEK button to move to the next randomly selected track.
Press the RND (button 4) button a second time to stop Random Play.
Mode
Press the MODE button repeatedly to select between the CD player, the optional remote CD changer and the Satellite Radio (if equipped). When Satellite Radio (if equipped) is selected "SA" will appear in your radio display.
A CD or tape may remain in the player while in the Satellite mode.
Time
Press the TIME button to change the display from elapsed CD playing time to time of day.
CD Changer Control Capability — If Equipped
This radio is compatible with a remote mounted CD changer available through Mopar Accessories. The following instructions are for the radio controls that operate this CD changer.
Mode Button
To activate the CD changer, press the MODE button until CD information appears on the display.
Push-Button
While the CD changer is playing, press the NUMBER 1 push-button or the NUMBER 5 push-button to select a disc numbered higher or lower than the one currently being played.
Seek Button
Press the SEEK up or down to select another track on the same disc. A SEEK symbol will appear on the display.
UNDERSTANDING YOUR INSTRUMENT PANEL 139
Fast Forward And Rewind Buttons
Press and hold the FF button for fast forward. Press and hold the RW button for fast reverse.
The audio output can be heard when fast forward and fast reverse are activated.
Random Play (RND)
Press the Random button to play the tracks on the selected disc in random order for an interesting change of pace.
Random can be cancelled by pressing the button a second time or by ejecting the CD from the changer.
CD Diagnostic Indicators
When driving over a very rough road, the CD player may skip momentarily. Skipping will not damage the disc or the player, and play will resume automatically.
As a safeguard and to protect your CD player, one of the following warning symbols may appear on your display.
A CD HOT symbol indicates the player is too hot.
CD HOT will pause the operation. Play can be resumed when the operating temperature is corrected or another MODE is selected.
An ERR symbol will appear on the display if the laser is unable to read the Disc data for the following reasons:
Excessive vibration
Disc inserted upside down
Damaged disc
Water condensation on optics
140 UNDERSTANDING YOUR INSTRUMENT PANEL
Radio Display Messages
Your radio has been designed to display certain messages when a problem is detected with the CD player.
SALES CODE RBT/RBY—AM STEREO & FM STEREO RADIO WITH GRAPHIC EQUALIZER, CASSETTE TAPE PLAYER AND CD PLAYER

 DISPLAY
EXPLANATION WHAT TO DO
DISPLAY
EXPLANATION WHAT TO DO
![]() Deadlock
problem See
your dealer for service
Deadlock
problem See
your dealer for service
![]() Disc
eject problem See
your dealer for service
Disc
eject problem See
your dealer for service
![]() Elevator
problem See
your dealer for service
Elevator
problem See
your dealer for service
![]() Magazine
eject problem Check that magazine is OK-if
not see your dealer for service
Magazine
eject problem Check that magazine is OK-if
not see your dealer for service
No
discs in magazine. ![]() Load discs in magazine.
Load discs in magazine.
Player
overheating. ![]() Allow to cool down.
Allow to cool down.
805c2ab6
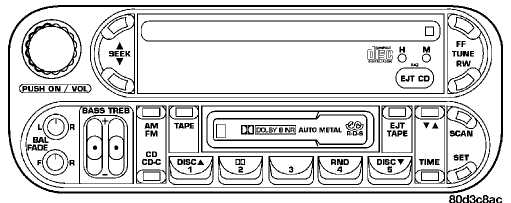
Operating Instructions - Radio Mode
NOTE: Power to operate the radio is supplied through the ignition switch. It must be in the ON or ACC position to operate the radio.
Power Switch, Volume Control
Press the ON/VOL control to turn the radio on. Turn the volume control to the right to increase the volume.
NOTE: The volume control knob will need to be pushed out for the ON position and in for the OFF position.
UNDERSTANDING YOUR INSTRUMENT PANEL 141
Seek (Radio Mode)
Press and release the SEEK button to search for the next station in either the AM or FM mode. Press the top of the button to seek up and the bottom to seek down. The radio will remain tuned to the new station until you make another selection. Holding the button in will bypass stations without stopping until you release it.
Tune
Press the TUNE control up or down to increase or decrease the frequency. If you press and hold the button, the radio will continue to tune until you release the button. The frequency will be displayed and continuously updated while the button is pressed.
Balance
The Balance control adjusts the left-to-right speaker balance. Push in the button and it will pop out. Adjust the balance and push the button back in.
Fade
The Fade control provides for balance between the front and rear speakers. Push in the button and it will pop out. Adjust the balance and push the button back in.
Tone Control
Slide the Bass and/or Treble controls up or down to adjust the sound for the desired tone.
AM/FM Selection
Press the top of the AM/FM CD/CD-C button to switch between AM and FM.
To Set The Radio Push-Button Memory
When you are receiving a station that you wish to commit to push-button memory, press the SET button. SET 1 will now show in the display window. Select the "1-5" button you wish to lock on this station and press and release that button. If a button is not selected within 5 seconds after pressing the SET button, the station will continue to play but will not be locked into push-button memory.
You may add a second station to each push-button by repeating the above procedure with this exception: Press the SET button twice and the symbol SET 2 will show in the display window. Each button can be set for SET 1 and SET 2 in both AM and FM. This allows a total of 10 AM and 10 FM stations to be locked into push-button
142 UNDERSTANDING YOUR INSTRUMENT PANEL
memory. The stations stored in SET 2 memory can be selected by pressing the push-button twice.
Time
Press the TIME button to change the display between radio frequency and time.
To set the clock, use a ballpoint pen or similar object to press the hour (H) or minute (M) buttons on the radio, The time setting will increase each time you press the button. Press any other button to exit from the clock setting mode.
Operating Instructions - Tape Mode
Insert the cassette with the exposed tape side toward the right and the mechanical action of the player will gently pull the cassette into the play position.
NOTE: When subjected to extremely cold temperatures, the tape mechanism may require a few minutes to warm up for proper operation. Sometimes poor playback may be experienced due to a defective cassette tape. Clean and demagnetize the tape heads at least twice a year.
(VA)
Pressing the (VA) button during tape mode will cause the other side of the tape to be played. The display will confirm the selected tape play direction. The time is always displayed.
Tape
Press the TAPE button to select the Tape mode.
Seek
Press the SEEK button up for the next selection on the tape and down to return to the beginning of the current selection.
Press the SEEK button up or down to move the track number to skip forward or backward 1 to 7 selections. Press the SEEK button once to move 1 selection, twice to move 2 selections, etc. the display will show the total number of times the SEEK button was pushed. The SEEK function will be cancelled by pressing either the FF/RW or AM/FM button.
UNDERSTANDING YOUR INSTRUMENT PANEL 143
Fast Forward (FF)
Press the FF button up momentarily to advance the tape in the direction that it is playing. The tape will advance until the button is pressed again or the end of the tape is reached. At the end of the tape, the tape will play in the opposite direction.
Rewind (RW)
Press the RW button down momentarily to reverse the tape direction. The tape will reverse until the button is pressed again or until the end of the tape is reached. At the end of the tape, the tape will play in the current direction.
EJT Tape
Press the EJT TAPE button and the cassette will disengage and eject from the radio.
Metal Tape Selection (70ms)
If a standard 70 u (metal) tape is inserted into the player, the player will automatically select the correct equalization.
Pinch Roller Release
If ignition power or the radio ON/OFF switch are turned off, the pinch roller will automatically retract to protect the tape from any damage. When power is restored to the tape player, the pinch roller will automatically reengage and the tape will resume play.
Dolby Noise Reduction
The
Dolby Noise Reduction System* is on when![]() ever the tape player is on, but may be
switched on/off.
ever the tape player is on, but may be
switched on/off.
To turn the Dolby Noise Reduction System on/off: Press the Dolby NR button (button 2) after you insert the tape. The NR light in the display will go off when the Dolby System is off.
* "Dolby" noise reduction manufactured under license from Dolby Laboratories Licensing Corporation. Dolby and the double-D symbol are trademarks of Dolby Laboratories Licensing Corporation.
144 UNDERSTANDING YOUR INSTRUMENT PANEL
Operation Instructions — CD Player
NOTE: The ignition switch must be in the ON or ACC position and the volume control ON before the CD player will operate.
Inserting The Compact Disc
You may either insert or eject a disc with the radio OFF.
If you insert a disc with the ignition ON and the radio OFF, the disc icon will be displayed in addition to the time of day.
If the volume control is ON, the unit will switch from radio to CD mode and begin to play when you insert the disc. The display will show the track number and index time in minutes and seconds. Play will begin at the start of track 1.
Seek
Press the top of the SEEK button for the next selection on the CD. Press the bottom of the button to return to the beginning of the current selection, or return to the beginning of the previous selection, if the CD is within the first second of the current selection.
EJTCD
Press the EJT CD button and the disc will unload and move to the entrance for easy removal. The unit will switch to the radio mode.
If you do not remove the disc within 15 seconds, it will be reloaded. The unit will continue in radio mode.
FF/TUNE/RW
Press FF (Fast Forward) and the CD player will begin to fast forward until FF is released. The RW (Reverse) button works in a similar manner.
RND (Random Play)
Press the RND button while the CD is playing to activate Random Play. This feature plays the selections on the compact disc in random order to provide an interesting change of pace.
Press the SEEK button to move to the next randomly selected track.
Press TUNE FF to fast forward through the tracks.
Press the RND button a second time to stop Random Play.
UNDERSTANDING YOUR INSTRUMENT PANEL 145
CD/CD-C
Press the bottom of the AM/FM CD/CD-C button to switch between the CD and CD changer (if equipped).
Time
Press the TIME button to change the display from elapsed CD playing time to time of day.
SATELLITE RADIO — IF EQUIPPED
Satellite radio uses direct satellite to receiver broadcasting technology to provide clear digital sound, coast to coast. The subscription service provider is Sirius™ Satellite Radio. This service offers up to 100 channels of music, sports, news, entertainment, and programming for children, directly from its satellites and broadcasting studios.
System Activation
To activate your Sirius Satellite Radio service, call the toll-free number 888-539-7474, or visit the Sirius web site at www.sirius.com. Please have the following information available when activating your system:
1. The Electronic Serial Number/Sirius Identification Number (ESN/SID).
Credit card information.
Your Vehicle Identification Number.
Electronic Serial Number/Sirius Identification Number (ENS/SID)
The Electronic Serial Number/Sirius Identification Number is needed to activate your Sirius Satellite Radio system. To access the ESN/SID, refer to the following steps:
ESN/SID Access With RBB and RBK Radios
With the ignition switch in the ACCESSORY position and the radio OFF, press the Tape Eject or CD Eject (depending on the radio type) and Time buttons simultaneously for 3 seconds. The first four digits of the twelve-digit ESN/SID number will be displayed. Press the SEEK UP button to display the next four digits. Continue to press the SEEK UP button until all twelve ESN/SID digits have been displayed. The SEEK DOWN will page down until the first four digits are displayed. The radio will exit the ESN/SID mode when any other button is pushed, the ignition is turned OFF, or 5 minutes has passed since any button was pushed.
146 UNDERSTANDING YOUR INSTRUMENT PANEL
ESN/SID Access With RBP, RBU, RAZ, and RBQ Radios
With the ignition switch in the ACCESSORY position and the radio OFF, press the CD Eject and TIME buttons simultaneously for 3 seconds. All twelve ESN/SID numbers will be displayed. The radio will exit the ESN/SID mode when any other button is pushed, the ignition is turned OFF, or 5 minutes has passed since any button was pushed.
Selecting Satellite Mode in RBB and RBK Radios
Press the MODE button repeatedly until "S A" appears in the display. A CD or tape may remain in the radio while in the Satellite radio mode.
Selecting Satellite Mode in RBP, RBU, RAZ, and RBQ Radios
Press the MODE button repeatedly until the word "SIRIUS" appears in the display. These radios will also display the following:
• After 3 seconds, the current channel name and channel number will be displayed for 5 seconds.
The
current program type and channel number will
then
be displayed for 5 seconds.
The
current channel number will then be displayed
until an action
occurs.
A CD or tape may remain in the radio while in the Satellite radio mode.
Selecting a Channel
Press and release the SEEK or TUNE buttons to search for the next channel. Press the top of the button to search up and the bottom of the button to search down. Holding the TUNE button causes the radio to bypass channels until the button is released.
Press and release the SCAN button (if equipped) to automatically change channels every 7 seconds. The radio will pause on each channel for 7 seconds before moving on to the next channel. The word "SCAN" will appear in the display between each channel change. Press the SCAN button a second time to stop the search.
UNDERSTANDING YOUR INSTRUMENT PANEL 147
NOTE: Channels that may contain objectionable content can be blocked. Contact Sirius Customer Care at 888-539-7474 to discuss options for channel blocking or unblocking. Please have your ESN/SID information available.
Storing and Selecting Pre-Set Channels
In addition to the 10 AM and 10 FM pre-set stations, you may also commit 10 satellite stations to push button memory. These satellite channel pre-set stations will not erase any AM or FM pre-set memory stations. Follow the memory pre-set procedures that apply to your radio.
Using the PTY (Program Type) Button (if equipped)
Follow the PTY button instructions that apply to your radio.
PTY Button "SCAN"
When the desired program type is obtained, press the "SCAN" button within five seconds. The radio will play 7 seconds of the selected channel before moving to the next channel of the selected program type. Press the "SCAN" button a second time to stop the search.
NOTE: Pressing the "SEEK" or "SCAN" button while performing a music type scan will change the channel by one and stop the search. Pressing a pre-set memory button during a music type scan, will call up the memory channel and stop the search.
PTY Button "SEEK"
When the desired program is obtained, press the "SEEK" button within five seconds. The channel will change to the next channel that matches the program type selected.
Satellite Antenna
To ensure optimum reception, do not place items on the roof around the rooftop antenna location. Metal objects placed within the line of sight of the antenna will cause decreased performance. Larger luggage items should be placed as far forward as possible. Do not place items directly on or above the antenna.
Reception Quality
Satellite reception may be interrupted due to one of the following reasons.
• The vehicle is parked in an underground parking structure or under a physical obstacle.
148 UNDERSTANDING YOUR INSTRUMENT PANEL
Dense
tree coverage may interrupt reception in the
form of short audio
mutes.
Driving
under wide bridges or along tall buildings can
cause
intermittent reception.
Placing
objects over or too close to the antenna can
cause signal
blockage.
CASSETTE TAPE AND PLAYER MAINTENANCE
To keep the cassette tapes and player in good condition, take the following precautions:
Do
not use cassette tapes longer than C-90; otherwise,
sound
quality and tape durability will be greatly dimin
ished.
Keep
the cassette tape in its case to protect from
slackness and dust
when it is not in use.
Keep
the cassette tape away from direct sunlight, heat
and magnetic
fields such as the radio speakers.
Before
inserting a tape, make sure that the label is
adhering flatly to
the cassette.
5. A loose tape should be corrected before use. To rewind a loose tape, insert the eraser end of a pencil into the tape drive gear and twist the pencil in the required directions.
Maintain your cassette tape player. The head and capstan shaft in the cassette player can pick up dirt or tape deposits each time a cassette is played. The result of deposits on the capstan shaft may cause the tape to wrap around and become lodged in the tape transport. The other adverse condition is low or "muddy" sound from one or both channels, as if the treble tone control were turned all the way down. To prevent this, you should periodically clean the head with a commercially available WET cleaning cassette.
As preventive maintenance, clean the head about every 30 hours of use. If you wait until the head becomes very dirty (noticeably poor sound), it may not be possible to remove all deposits with a simple WET cleaning cassette.
UNDERSTANDING YOUR INSTRUMENT PANEL 149
CD/DVD DISC MAINTENANCE
To keep the CD/DVD discs in good condition, take the following precautions:
Handle
the disc by its edge; avoid touching the
surface.
If
the disc is stained, clean the surface with a soft cloth,
wiping
from center to edge.
Do
not apply paper, paper CD labels, or tape to the
disc; avoid
scratching the disc.
Do
not use solvents such as benzine, thinner, cleaners,
or
antistatic sprays.
Store the disc in its case after playing.
Do not expose the disc to direct sunlight.
Do
not store the disc where temperatures may become
too high.
RADIO OPERATION AND CELLULAR PHONES
Under certain conditions, the cellular phone being On in your vehicle can cause erratic or noisy performance from your radio. This condition may be lessened or eliminated by relocating the cellular phone antenna. This condition is not harmful to the radio. If your radio performance does not satisfactorily "clear" by the repositioning of the antenna, it is recommended that the radio volume be turned down or off during cellular phone operation.
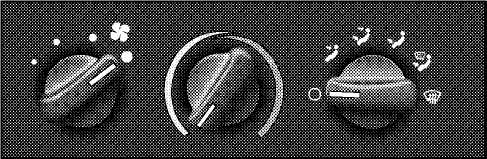
CLIMATE CONTROLS
The controls for the heating and ventilation system in this vehicle consist of three rotary control knobs. These comfort controls can be set to obtain desired interior conditions.
NOTE: For the HVAC to operate efficiently and reduce the possibility of fog build up on the interior of the windows, the air exhausters should be kept clear at all times. The air exhausters are the slots located on the rear tailgate.
150 UNDERSTANDING YOUR INSTRUMENT PANEL
Heater Only — If Equipped
80bce997
In snowy weather, always clear the air inlet grille at the base of the windshield before driving your vehicle.
Blower Switch
$} The blower switch is the rotary knob to the left of the controls. The blower speed will increase as the knob is turned clockwise. There are four blower speeds.
NOTE: The blower motor will run until the system is turned to the "Off" ("O") position or the ignition is turned OFF.
Temperature Control
The temperature control is the center knob located on the climate controls. It controls the temperature of the air delivered to the passenger compartment.
The "Blue" area on the left side of the control indicates cooler temperatures while the "Red" area indicates warmer temperatures.
Mode Selection
The mode selector is the right knob located on the climate controls. It can be set in any of the following positions:
Off
Q This position turns off the blower motor. In this mode, there may be some slight air flow from the floor outlets, side window outlets, and defrost outlet located at the base of the windshield.
Panel
Air comes from the outlets in the instrument panel. Each of these outlets can be individually adjusted to direct the flow of air. Also, a slight amount of airflow may be noticed at the defrost outlet located at the base of the windshield.
UNDERSTANDING YOUR INSTRUMENT PANEL 151
Bi-Level
Air
comes from both instrument panel and floor
![]() outlets. Also, a slight amount of airflow may be
outlets. Also, a slight amount of airflow may be
noticed at the defrost outlet located at the base of the
windshield.
1 Air comes from the floor outlets. Also, a slight
Floor
V
amount of airflow may be noticed at the defrost outlet located at the base of the windshield.
Mix
Air
comes from the floor and defrost outlets with ![]() air being directed through the demisters.
This mode works best in cold or snowy
conditions. It
air being directed through the demisters.
This mode works best in cold or snowy
conditions. It
allows you to stay comfortable while keeping the
windshield clear.
Defrost
Air
comes from the windshield outlets with a ![]() slight amount of air being directed through
the
slight amount of air being directed through
the
floor and demisters. Use this setting when necessary
to defrost or defog your windshield.
Air Conditioning — If Equipped
Blower Switch
The
blower switch is the rotary knob to the left of the ![]() controls. Turn the knob to the right to one
of the four positions to obtain the blower
speed you desire.
controls. Turn the knob to the right to one
of the four positions to obtain the blower
speed you desire.
NOTE: The blower motor will run until the system is turned to the "Off" ("O") position or the ignition is turned OFF.
152 UNDERSTANDING YOUR INSTRUMENT PANEL

Mode Selection
The temperature control is the center knob located on the climate controls. It controls the temperature of the air delivered to the passenger compartment.

 The
"Blue" area on the left side of the control indicates
cooler temperatures while the "Red" area indicates warmer
temperatures.
The
"Blue" area on the left side of the control indicates
cooler temperatures while the "Red" area indicates warmer
temperatures.
The mode selector is the right knob located on the climate controls. It can be set in any of the following positions:
Off
Q Turning the rotary knob to this position shuts off the blower motor and outside air will not come through any outlet.
UNDERSTANDING YOUR INSTRUMENT PANEL 153
![]() Recirculation
Recirculation
![]() Select
this position when the outside air contains smoke, odors, high
humidity, or if rapid cooling is desired. This feature allows for
recirculation of interior air only. Air flows through the panel
outlets in this mode. Also, a slight amount of airflow may be
noticed at the defrost outlet located at the base of the windshield.
Select
this position when the outside air contains smoke, odors, high
humidity, or if rapid cooling is desired. This feature allows for
recirculation of interior air only. Air flows through the panel
outlets in this mode. Also, a slight amount of airflow may be
noticed at the defrost outlet located at the base of the windshield.
Panel
Outside
air flows through the air conditioning ![]() system, and then through the outlets
located in the instrument panel. Also, a
slight amount of
system, and then through the outlets
located in the instrument panel. Also, a
slight amount of
airflow may be noticed at the defrost outlet located at
the base of the windshield.
Bi-Level
Outside
air flows through the air conditioning ![]() system, and then through the outlets
located in the instrument panel and those located on the floor.
Also, a slight amount of airflow may be
noticed at the defrost outlet located at
the base of the windshield.
system, and then through the outlets
located in the instrument panel and those located on the floor.
Also, a slight amount of airflow may be
noticed at the defrost outlet located at
the base of the windshield.
Panel
Outside air comes from the outlets in the instrument panel. Each of these outlets can be individually adjusted to direct the flow of air. Also, a slight amount of airflow may be noticed at the defrost outlet located at the base of the windshield.
Floor
Outside
air comes from the floor outlets. Also, a ![]() slight amount of airflow may be noticed at
the defrost outlet located at the base of
the windshield.
slight amount of airflow may be noticed at
the defrost outlet located at the base of
the windshield.
Mix
Air
comes from the floor and defrost outlets. This
![]() mode works best in cold or snowy conditions. It
allows you to stay comfortable while
keeping the windshield clear.
mode works best in cold or snowy conditions. It
allows you to stay comfortable while
keeping the windshield clear.
Defrost
Air
comes from the windshield outlets with a ![]() small amount being directed through the
floor
small amount being directed through the
floor
outlets. Use this setting when necessary to defrost
your windshield.
154 UNDERSTANDING YOUR INSTRUMENT PANEL
NOTE: For improved safety, the A/C compressor is activated when "Mix" or "Defrost" modes are selected. This is done to assist in drying the air and it will help in keeping the windshield from fogging.
Operating Tips
Summer Operation
The engine cooling system in air conditioned vehicles must be protected with a high-quality antifreeze coolant to provide proper corrosion protection and to protect against engine overheating. A 50% solution of ethylene glycol antifreeze coolant in water is recommended.
Winter Operation
The air from the heater system will heat faster in cold weather if you use lower blower speeds until the engine warms up.
REAR WINDOW FEATURES — HARD TOP ONLY
Rear Window Defogger
To
turn the rear window defogger on, press the ![]() rocker switch. If you press the switch a
second
rocker switch. If you press the switch a
second
time, you will turn the defogger off. A light on the rocker
switch will indicate the defogger is on.
The defogger will automatically turn off after about ten minutes. For five more minutes of operation, depress the top of the switch to turn the defogger on again. To prevent excessive battery drain use the defogger only when the engine is operating.
UNDERSTANDING YOUR INSTRUMENT PANEL
CAUTION!
Use
care when washing the inside of the rear window to prevent
damage to heating elements. Use a soft cloth and a mild washing
solution, wiping parallel to the heating elements. Also, keep all
objects a safe distance from the window to prevent damaging the
heating elements.
Rear
Window Wiper/Washer
![]() To
utilize the rear wiper, press the switch to the first detent. To
activate the rear washer, depress the switch to the second detent.
The washer will continue to spray as long as the switch is held. The
switch will return to the wiper mode when released. To turn the rear
wiper off, lift the bottom of the switch.
To
utilize the rear wiper, press the switch to the first detent. To
activate the rear washer, depress the switch to the second detent.
The washer will continue to spray as long as the switch is held. The
switch will return to the wiper mode when released. To turn the rear
wiper off, lift the bottom of the switch.
Adding Washer Fluid
The fluid reservoir for the windshield washers and the rear window washer is shared. It is located in the front of the engine compartment on the passenger side and should be checked for fluid level at regular intervals. Fill the reservoir with windshield washer solvent (not radiator antifreeze) and operate the system for a few seconds to flush out the residual water.