Ā
1993 Jeep Cherokee
1993 ENGINE PERFORMANCE
Chrysler Corp. 2 . 5L & 4.0L System & Component Testing
Jeep; Cherokee, Grand Cherokee, Wrangler
INTRODUCTION
NOTE: For Grand Cherokee with 5.2L engine, see I - 5.2L SYS/COMP TESTS article in this section.
Before testing separate components or systems, perform procedures in F - 2.5L & 4.0L BASIC TESTING article in this section. Since many computer-controlled and monitored components set a trouble code if they malfunction, also perform procedures in G - 2.5L & 4.0L TESTS W/ CODES article in this section.
NOTE: Testing individual components does not isolate possible short or open circuits. Unless stated otherwise in test procedure, perform all voltage tests with a Digital Volt-Ohmmeter (DVOM) having a minimum 10-megohm input impedance. Use ohmmeter to isolate wiring harness short or open circuits.
COMPUTERIZED ENGINE CONTROLS
POWERTRAIN CONTROL MODULE (PCM)
Power & Ground Circuits
Check power and ground circuits using a DVOM and appropriate wiring diagram in L - WIRING DIAGRAMS article in this section.
ENGINE SENSORS & SWITCHES
Camshaft Position Sensor
Use an analog voltmeter. DO NOT remove distributor
connector from distributor. Insert voltmeter leads into backside of
distributor wiring harness connector to make contact with terminals.
Ensure connector is not damaged when inserting test probes.
Insert positive voltmeter lead into camshaft position
sensor signal output circuit (Tan/Yellow wire on Cherokee and
Wrangler; Gray/Black wire on Grand Cherokee) at distributor wiring
harness connector. Insert negative voltmeter lead into ground circuit
(Black/Light Blue wire) at distributor wiring harness connector. Set voltmeter to 15-volt DC scale.
With distributor cap removed, manually rotate engine until
pulse ring enters sync signal generator on camshaft position sensor.
Distributor rotor should be at 9 oÆclock position. Turn ignition
switch to ON position. With pulse ring positioned in the sync signal
generator, reading should be approximately 5 volts.
If no voltage is present, check voltmeter leads for good
connections. If connections are okay and there is still no voltage,
check for voltage at supply circuit (Orange wire on Cherokee and
Wrangler; White/Black wire on Grand Cherokee).
If no voltage is present at supply wire, remove PCM
connector. Check voltage at PCM pin No. 7 and ground with wiring
harness connected. PCM is located on left side of engine compartment.
If there is no voltage at PCM, see appropriate camshaft position
sensor circuit tests in G - 2.5L & 4.0L TESTS W/ CODES article in this
section.
If voltage is present at supply wire, replace camshaft
position sensor. If voltage is present at PCM pin No. 7, but not at
supply wire, check continuity of supply wire between the distributor
connector and the PCM. If no continuity exists, repair wiring harness
as necessary.
If supply wire is okay, check continuity between camshaft
position sensor signal output wire at the distributor connector and
PCM pin No. 44. If no continuity exists, repair wiring harness as
necessary.
If camshaft position sensor signal output wire is okay,
check continuity between ground circuit wire at the distributor
connector and ground. If no continuity exists, repair wiring harness
as necessary. If ground wire is okay, go to next step.
While observing voltmeter, crank engine. Voltmeter needle
should fluctuate from 0-5 volts while the engine is cranking. This
verifies that camshaft position sensor in distributor is operating
properly and that a sync pulse signal is being generated. If voltmeter
does not fluctuate, replace camshaft position sensor.
Charge Air Temperature Sensor (Grand Cherokee) See MANIFOLD AIR TEMPERATURE (MAT) SENSOR below.
Coolant Temperature Sensor
1) Disconnect coolant temperature sensor. Using a DVOM, check
sensor resistance. Resistance should be as specified in the
COOLANT TEMP SENSOR & MANIFOLD AIR TEMP SENSOR RESISTANCE table. Replace sensor if necessary.
2) Check continuity between PCM wiring harness terminal No. 2
and sensor connector terminal. Also check continuity between PCM
wiring harness terminal No. 4 and sensor connector terminal. Repair
wiring if an open circuit is indicated.
NOTE: Also see appropriate coolant temperature sensor tests in G - 2.5L & 4.0L TESTS W/ CODES article in this section.
COOLANT TEMP SENSOR & MANIFOLD AIR TEMP SENSOR RESISTANCE TABLE Temperature F (C) Minimum Ohms Maximum Ohms
-40 (-40) 291,490 381,710
-4 (-20) 85,850 108,390
14 (-10) 49,250 61,430
32 (0) 29,330 35,990
50 (10) 17,990 21,810
68 (20) 11,370 13,610
77 (25) 9120 10,880
86 (30) 7370 8750
104 (40) 4900 5750
122 (50) 3330 3880
140 (60) 2310 2670
158 (70) 1630 1870
176 (80) 1170 1340
194 (90) 860 970
212 (100) 640 720
230 (110) 480 540
248 (120) 370 410
Crankshaft Position Sensor
1) Disconnect crankshaft position sensor. Connect ohmmeter across sensor terminal No. 2 (Black/Light Blue wire) and terminal No. 1 (Gray/Black wire on Cherokee and Wrangler; Red/Light Green wire on
Grand Cherokee).
2) Ohmmeter should indicate an open circuit. Replace sensor if reading is not as specified. Also see appropriate crankshaft position sensor tests in G - 2.5L & 4.0L TESTS W/ CODES article in this section.
Manifold Absolute Pressure (MAP) Sensor
Inspect MAP sensor vacuum hose connections at throttle
body and sensor. Replace or repair vacuum hose if necessary.
Turn ignition on with engine off. Using DVOM, check MAP
sensor output voltage. Connect DVOM to MAP sensor terminal "B" (Dark
Green/Red wire on Cherokee and Wrangler; Red/White wire on Grand
Cherokee) and ground. Terminal identification letters are marked on
sensor body.
Output voltage should be 4-5 volts. Voltage should drop to
1.5-2.1 volts with a hot engine operating in Neutral and at idle
speed. Also check for output voltage at PCM wiring harness terminal
No. 1 on Cherokee and Wrangler or terminal No. 5 on Grand Cherokee. If
voltage is not as previously specified, repair wiring harness as
necessary.
With ignition on, check MAP sensor supply voltage at
sensor connector terminal "C" (Violet/White wire). Supply voltage
should be 4.5-5.5 volts. Also check for supply voltage at PCM wiring
harness terminal No. 6. If supply voltage is not as specified, repair
wiring harness if necessary.
Check continuity of MAP sensor ground circuit at sensor
connector terminal "A" (Black/Light Blue wire) and PCM wiring harness
terminal No. 4. Check continuity of MAP sensor ground circuit at
sensor connector terminal No. 1 (Black/Light Blue wire) and PCM wiring
harness terminal No. 4. Repair wiring harness if necessary.
Check continuity of MAP sensor ground circuit between PCM
wiring harness terminals No. 4 and 11. If ohmmeter indicates an open
circuit, go to next step. If ground connection is okay, replace PCM.
NOTE: If terminal No. 4 has a short circuit to 12 volts, correct this condition before replacing PCM. If necessary, perform appropriate MAP sensor tests in G - 2.5L & 4.0L TESTS W/ CODES article in this section.
7) Check for defective sensor ground connection. Connection
is located on right side of engine block, at oil dipstick tube
mounting block. Repair connection as necessary.
Manifold Air Temperature (MAT) Sensor
Disconnect manifold air temperature sensor. Using DVOM,
check sensor resistance. Resistance should be as specified in the
COOLANT TEMP SENSOR & MANIFOLD AIR TEMP SENSOR RESISTANCE table. If
resistance is not as specified, replace sensor.
Check resistance between PCM wiring harness terminal No.
21 and sensor connector terminal. Also check resistance between PCM
wiring harness terminal No. 4 and sensor connector terminal. Repair
wiring if resistance is greater than one ohm.
Oxygen (O2) Sensor (Heating Element)
Disconnect oxygen sensor connector. Using an ohmmeter, check sensor heating element resistance. On Cherokee, connect ohmmeter to Black/Tan and Dark Green/Black sensor wires. On Wrangler, connect ohmmeter to Black and Dark Green/Orange sensor wires. On Grand Cherokee, connect ohmmeter to Black/Tan and Orange/Dark Blue sensor wires. Heating element resistance should be 5-7 ohms. Replace oxygen sensor if ohmmeter reads infinity.
Park/Neutral Switch (AW-4 Auto. Trans.)
Disconnect park/neutral switch. Ensure continuity exists
between terminals "B" and "C" with transmission in Park or Neutral.
See Fig. 1.
Ensure continuity exists between terminals "A" and "E"
with transmission in Reverse. See Fig. 1. Ensure continuity exists
between terminals "A" and "G" with transmission in 3rd gear.
Ensure continuity exists between terminals "A" and "H"
with transmission in 1st or 2nd gear. See Fig. 1. If switch continuity
tests are okay, check gearshift adjustment or back-up light circuit.
If switch fails any continuity test, replace park/neutral switch.
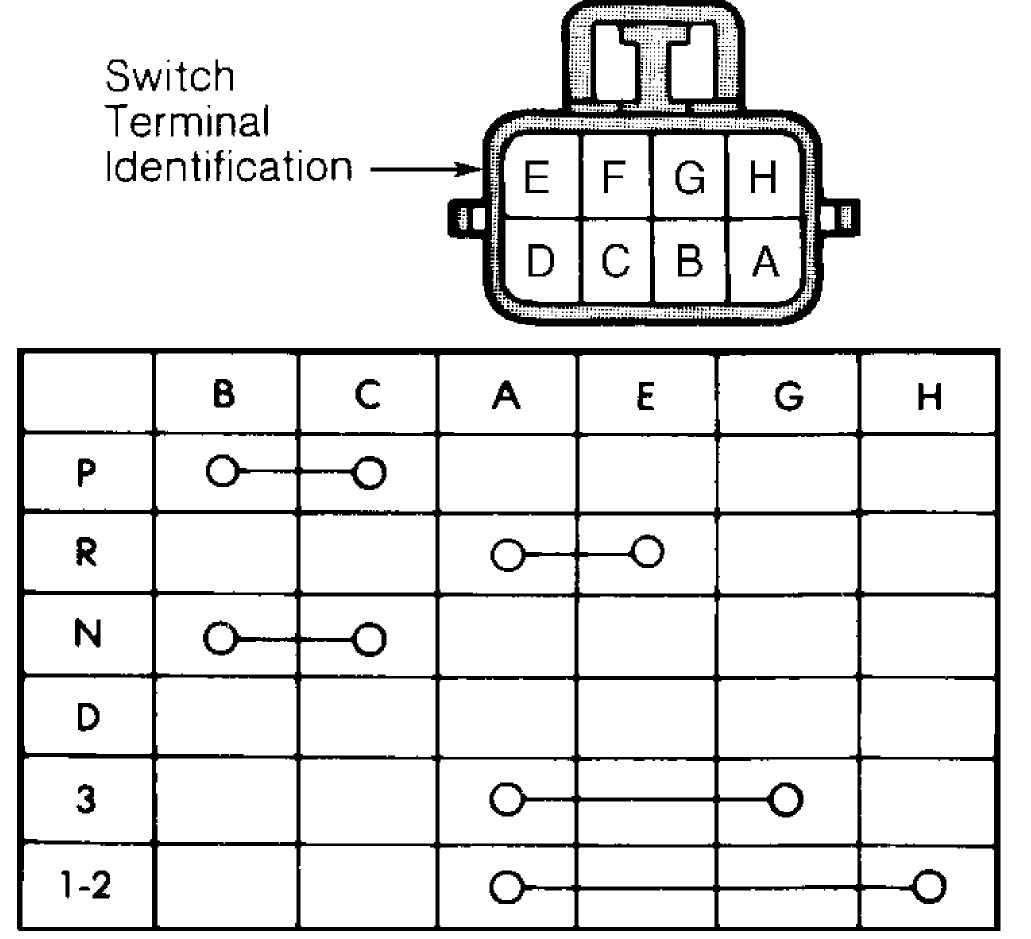
91C13971
Fig. 1: Testing Park/Neutral Switch Continuity (AW-4 Auto. Trans.) Courtesy of Chrysler Corp.
NOTE: Also see appropriate park/neutral switch input test
procedures in G - 2.5L & 4.0L TESTS W/ CODES article in
this section.
Park/Neutral Switch (32RH Auto. Trans.)
Disconnect park/neutral switch. Check continuity between
switch center terminal and transmission case. Continuity should exist
only when transmission is in Park or Neutral.
Shift transmission into Reverse. Check continuity between
the 2 outside terminals on switch. Continuity should exist only when
transmission is in Reverse. Check continuity between each outer
terminal and transmission case.
Continuity should not exist between either terminal and
case while in Reverse. If switch continuity tests are okay, check
gearshift adjustment or back-up light circuit. If switch fails any
continuity test, replace park/neutral switch.
Throttle Position Sensor (TPS)
Turn ignition on. Check TPS output voltage at sensor
wiring harness center terminal. At idle, output voltage should be
greater than .2 volt.
Gradually open throttle plate. Output voltage should
gradually increase as throttle plate is opened. At wide open throttle,
output voltage must be less than 4.8 volts.
NOTE: Also see appropriate throttle position sensor tests in G - 2.5L & 4.0L TESTS W/ CODES article in this section.
Vehicle Speed Sensor
See appropriate vehicle speed sensor tests in G - 2.5L & 4.0L TESTS W/ CODES article in this section.
MODULES, MOTORS & RELAYS
MODULES
Theft Alarm Module (Cherokee & Grand Cherokee)
Turn ignition switch to ACC position 3 times and leave in
ACC position to activate Security Alarm Module (SAM) self-diagnostics.
If headlights do not flash, go to step 3).
If horn does not sound twice, go to step 9). If exterior
lights do not flash, go to step 10). If parking lights and taillights
do not flash, go to step 11). If horn sounds twice and headlights,
parking lights and taillights flash, go to step 12).
NOTE: For identifying circuits referred to in testing, see
appropriate wiring diagram in L - WIRING DIAGRAMS article in this section.
3) Check for battery voltage at terminal No. 1 of security
alarm module relay (located in relay center under glove box). If less
than battery voltage is present, repair open to fuse No. 7 (15-amp)
and retest. If system does not operate properly, go to next step. If
battery voltage is present, go to step 5). If system operates
properly, stop test procedure.
NOTE: If SECURITY light comes and remains on with ignition on, the Chrysler Collision Detection (CCD) bus communication with the PCM has been lost. After servicing vehicle ensure that system operates properly. A malfunctioning anti-theft system may keep engine from starting.
4) Using an ohmmeter, check continuity between security alarm
module relay terminal No. 2 and headlight feed wires. If continuity
exists, replace security alarm module relay and retest. If continuity does not exist, repair open in wiring circuit as necessary and retest.
Check for battery voltage at security alarm module relay
terminal No. 3. If battery voltage is not present, repair open in
wiring circuit as necessary. If battery voltage is present, go to step
7) . If less than battery voltage is present, turn ignition switch to
RUN position, then turn ignition off.
Check continuity between security alarm module relay pins
No. 3 and 5. If continuity does not exist, replace security alarm
module relay and retest. If continuity exist, check continuity between
security alarm module terminal No. 7 (located behind center cluster
bezel on instrument panel) and security alarm module relay pin No. 5.
If continuity exists, replace security alarm module and retest. If
continuity does not exist, repair open in wiring circuit as necessary
and retest.
Turn ignition switch to RUN position, then turn ignition
off. Check continuity between security alarm module relay pin No. 3
and ground. If continuity does not exist, repair open in wiring
circuit as necessary and retest. If continuity exists, replace
security alarm module relay with known good relay. If system does not
operate properly, go to next step. If system operates properly, stop
test procedure.
Using an ohmmeter, check continuity between security alarm
module relay terminal No. 2 and headlights. If continuity exists,
replace security alarm module relay and retest. If continuity does not
exist, repair open in wiring circuit as necessary and retest.
Turn ignition switch to RUN position, then turn ignition
off. If horn does not operate properly, check horn system for
malfunction. Repair as necessary and retest. If horn operates
properly, check continuity between security alarm module terminal No.
12 and horn relay connector. If continuity exists, replace security
alarm module. If continuity does not exist, repair open in wiring
circuit and retest.
10) Turn ignition switch to RUN position, then turn ignition
off. If flash-to-pass does not operate, check and repair fuse No. 7
(15-amp) as necessary and retest. If flash-to-pass operates, check for
battery voltage at security alarm module pin No. 21. If battery voltage is present, replace security alarm module. If voltage is less than battery voltage, repair open in wiring circuit to fuse and retest.
Check for battery voltage at lamp outage module pin No.
6. If battery voltage is present, repair open in light system. If
voltage is less than battery voltage, check for battery voltage at
security alarm module pin No. 14. If battery voltage is present,
repair open in wiring circuit between security alarm module and rear
lights. If less than battery voltage is present, replace security
alarm module.
Ensure all doors and liftgate are closed. Verify that
SECURITY light is flashing. If SECURITY light is not flashing, check
bulb and wiring harness. Repair or replace as necessary. If bulb and
wiring are okay, replace security alarm module and retest system.
If SECURITY light is flashing, turn ignition switch to
OFF position. Remove illuminated entry relay from vehicle. Relay is
located on a bracket behind instrument panel.
Check theft alarm switches by opening and closing doors
and liftgate. Replace switch(es) or repair wiring harness as
necessary. If switches are okay, check hood switch by opening and
closing hood.
Replace hood switch or repair wiring harness as
necessary. If hood switch is okay, unlock (with key) each front door and liftgate one at a time to test disarm switches. Replace switch(es) or repair wiring harness as necessary and retest system.
16) If disarm switches are okay, cycle power door locks to
lock position and then unlock. If power door locks do not operate properly, replace door lock switch(es), lock/unlock relay(s) or repair wiring harness as necessary. Retest system.
If power door locks operate properly, lock and unlock
vehicle with keyless entry transmitter. If power door locks do not
operate properly, replace keyless entry transmitter, receiver or
repair wiring harness as necessary and retest system.
If keyless entry system operates properly, turn ignition
switch to ON position and wait 30 seconds. If SECURITY light comes on
and stays on, repair or replace CCD bus and wiring as necessary and
retest system. If SECURITY light remains off, theft alarm system is
operating properly.
NOTE: A functional PCM that has been used in a vehicle equipped with theft alarm system CANNOT be used in another vehicle that is NOT equipped with theft alarm system.
MOTORS
Idle Air Control (IAC) Motor See IDLE CONTROL SYSTEM.
RELAYS
A/C Compressor Clutch Relay
See A/C COMPRESSOR CLUTCH under MISCELLANEOUS CONTROLS.
Automatic Shutdown (ASD) Relay
See appropriate ASD relay tests in G - 2.5L & 4.0L TESTS W/ CODES article in this section.
Fuel Pump Relay
See FUEL PUMP RELAY under FUEL DELIVERY.
Radiator (Cooling) Fan Relay
See RADIATOR (COOLING) FAN under MISCELLANEOUS CONTROLS.
Starter Motor Relay
Some relays have battery voltage supplied to terminal No. 30. Others have battery voltage supplied to terminals No. 87 or 87A. See Fig. 2. In de-energized position, relay should have continuity between terminals No. 87A and No. 30. Resistance value between terminals No. 85 and No. 86 should be 70-80 ohms for resistor type relays or 81-91 ohms for diode type relays.
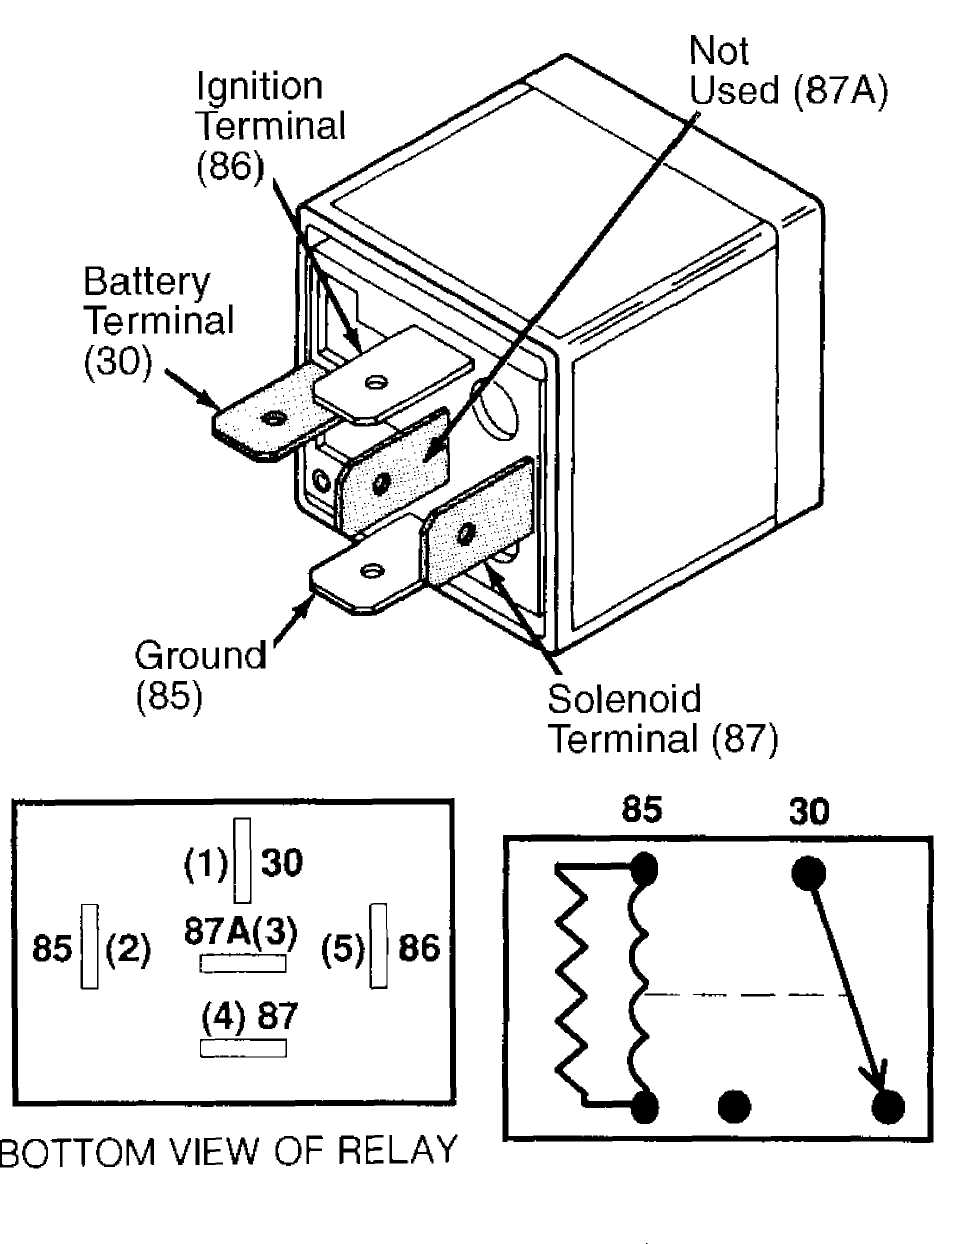
86 87 87A
9ą«13972 DE-ENERGIZED RELAY
Fig. 2: Identifying Relay Terminals & Testing Relays (Typical) Courtesy of Chrysler Corp.
FUEL SYSTEM
FUEL DELIVERY
NOTE: Always relieve fuel pressure before disconnecting any fuel injection-related component. Also see appropriate fuel delivery system or fuel injector control circuit tests in G - 2.5L & 4.0L TESTS W/ CODES article in this section.
Fuel System Pressure Release Procedure
Disconnect negative battery cable. Slowly open fuel tank
cap to release fuel tank pressure. Remove protective cap from pressure
test port on fuel rail.
Using Fuel Pressure Gauge Tool Set (5069), obtain fuel
pressure gauge and hose assembly. Remove gauge from hose. Place gauge
end of hose in approved gasoline container. Place shop towel under
test port. Screw other end of hose onto fuel pressure test port.
Release fuel pressure. After pressure is released, remove hose from
test port. Install protective cap on pressure test port.
If gauge tool set is not available, perform step 1). Using
a small screwdriver, wrapped in shop towels, push test port valve in
to relieve fuel pressure. Absorb spilled fuel with shop towels. Remove
shop towels and dispose properly. Install protective cap on pressure
test port.
Fuel System Pressure Test
1) Remove cap from pressure fitting in fuel rail. See Fig. 3. Using a shop towel to absorb any spilled fuel, connect a 0-60 psi (0-4.22 kg/cm) fuel pressure gauge to pressure fitting on fuel rail. Disconnect vacuum hose from fuel pressure regulator. Start engine.
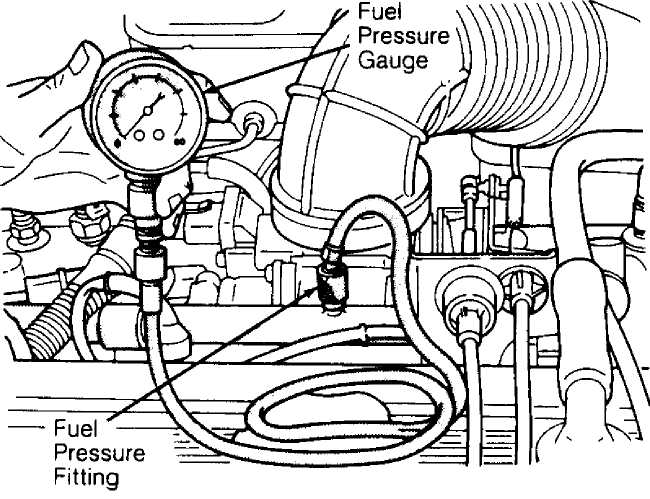
Fig. 3: Testing Fuel System Pressure Courtesy of Chrysler Corp.
2) Pressure should be approximately 39 psi (2.74 kg/cm) with vacuum hose disconnected and 31 psi (2.18 kg/cm) with vacuum hose
connected to fuel pressure regulator.
If fuel pressure is not 8-10 psi (.56-.70 kg/cm) higher
with vacuum hose disconnected from fuel pressure regulator, inspect
vacuum hose for blockage, leaks, kinks or other damage. If vacuum hose
is okay, replace fuel pressure regulator.
If fuel pressure exceeds 45 psi (3.1 kg/cm), check fuel
return line for kinks or blockage. If fuel pressure is low, release
fuel system pressure. See FUEL SYSTEM PRESSURE RELEASE PROCEDURE
heading above. Disconnect fuel return line on fuel rail near fuel
pressure regulator. Connect 5/16" fuel hose between disconnected fuel
return line and fuel rail.
CAUTION: Fuel pressure will rise as high as 100 psi (6.9 kg/cm) when fuel return line is pinched off. Ensure connections are properly secured. DO NOT pinch off hose for longer than 5 seconds.
Restart vehicle and let engine idle. Momentarily pinch off
hose connected to fuel return line. Note fuel gauge pressure reading.
Pressure should rise to approximately 75 psi (5.2 kg/cm) within 2
seconds.
If fuel pressure rises as specified, pressure is operating
at maximum capacity and is correct. If fuel pressure does not rise as
specified, turn engine off. Release fuel system pressure. See FUEL
SYSTEM PRESSURE RELEASE PROCEDURE heading above. Raise and support
vehicle. Disconnect fuel supply line at inlet (fuel tank side) of fuel
filter. Connect 3/8" fuel hose between fuel filter and fuel supply
line.
Restart vehicle and let engine idle. Momentarily pinch off
hose connected to fuel supply line. Note fuel pressure gauge reading.
Pressure should rise to approximately 75 psi (5.2 kg/cm) within 2
seconds. If fuel pressure rises as specified, but pressure is not same
at fuel rail, check for plugged or restricted fuel filter. Also check
fuel supply line between fuel filter and fuel rail for kinks or
blockage.
Fuel Pressure Leak-Down Test
Remove cap from pressure fitting on fuel rail. See Fig. 3.
Connect a 0-100 psi (0-6.9 kg/cm) fuel pressure gauge to pressure
fitting on fuel rail. Start and run engine at idle.
Turn engine off and note fuel pressure gauge reading.
Leave fuel pressure gauge connected. Allow 30 minutes to elapse and
then compare fuel pressure gauge reading to reading taken when engine
was turned off.
A pressure drop up to 20 psi (1.4 kg/cm) within 30
minutes is within specification. If pressure drop is not within
specification, go to next step. If pressure drop is within
specification, the fuel pump outlet check valve and fuel pressure
regulator are operating correctly.
Release fuel system pressure. See FUEL SYSTEM PRESSURE
RELEASE PROCEDURE heading above. Disconnect both fuel lines at fuel
rail near fuel pressure regulator. Connect 3/8" fuel hose between
disconnected fuel supply line and fuel rail. Connect 5/16" fuel hose
between disconnected fuel return line and fuel rail.
Start engine and record fuel pressure gauge reading. Turn
engine off. Pinch off hose connected to fuel return line. Allow 30
minutes to elapse. If pressure drop is within specification, go to
next step. A pressure drop of more than 20 psi (1.4 kg/cm) within 30
minutes indicates pressure is bleeding past fuel pump outlet check
valve. Replace fuel pump assembly, located in fuel tank.
Pinch off hose connected to fuel supply line. Allow 30
minutes to elapse. A pressure drop of more than 20 psi (1.4 kg/cm)
within 30 minutes indicates pressure is bleeding past fuel pressure
regulator. Replace fuel pressure regulator.
Fuel Pump Capacity Test
1) Release fuel system pressure. See FUEL SYSTEM PRESSURE
RELEASE PROCEDURE heading above. Disconnect fuel supply line at fuel
rail near fuel pressure regulator. Connect 3/8" fuel hose to
disconnected fuel supply line. Insert other end of hose into approved
gasoline container. Start engine. Check fuel pump flow rate
(capacity).
2) A good fuel pump will deliver at least 1.05 qts. (1.0L) of
fuel per minute with return line hose pinched off. If fuel pump
capacity is incorrect, inspect fuel supply system for a plugged filter
or plugged fuel pump inlet filter.
Fuel Pump Relay
Some relays have battery voltage connected to terminal No. 30. Others have battery voltage connected to terminals No. 87 or 87A. See Fig. 2. In de-energized position, relay should have continuity between terminals No. 87A and No. 30. Resistance value between terminals No. 85 and No. 86 should be 70-80 ohms for resistor type relays, or 81-91 ohms for diode type relays.
FUEL CONTROL
Fuel Injectors
Disconnect injector from wiring harness. Connect ohmmeter on injector terminals. Resistance should be about 13.3-15.7 ohms at 68F (20C).
Oxygen (O2) Sensor
See OXYGEN (O2) SENSOR (HEATING ELEMENT) under ENGINE SENSORS & SWITCHES.
IDLE CONTROL SYSTEM
Idle Air Control (IAC) Motor
Set parking brake and block drive wheels. Route all
Exerciser Tester (7558) cables away from cooling fans, drive belt,
pulleys, and exhaust components. Return engine idle speed to normal
before disconnecting exerciser.
With ignition off, disconnect IAC motor connector at
throttle body. Plug in exerciser tester harness connector into IAC
motor. Connect Red clip of exerciser to battery positive terminal.
Connect Black clip to battery negative terminal. Red light
on exerciser will flash if exerciser is properly connected. Start
engine. Move exerciser switch to HIGH position. Engine speed should
increase. Move switch to LOW position. Engine speed should decrease.
If engine idle speed changes while using exerciser, IAC
motor is working properly. Return engine speed to normal idle and
disconnect exerciser from IAC motor.
If engine idle did not change, turn ignition off. DO NOT
disconnect exerciser from IAC motor. Remove IAC motor from throttle
body. With ignition off, cycle the exerciser switch between HIGH and
LOW positions. Pintle should move in and out of motor.
CAUTION: When checking IAC motor operation with motor removed from throttle body, DO NOT extend pintle more than 1/4" (6.35 mm), as pintle may separate from motor. The IAC motor must be replaced if pintle separates from motor.
6) If pintle still does not move, replace IAC motor. Start
engine and test replacement motor. If pintle now operates properly,
check IAC motor bore in throttle body and clean if necessary. Reinstall IAC motor and retest.
7) If throttle body is clear of obstructions, USE A Chrysler Corp. Diagnostic Readout Box II (DRB-II) tester and refer to appropriate IAC motor tests in G - 2.5L & 4.0L TESTS W/ CODES article in this section.
IGNITION SYSTEM
TIMING CONTROL SYSTEMS
Ignition timing is electronically controlled by Powertrain Control Module (PCM). Base ignition timing is NOT adjustable with this system. PCM controlled ignition system consists of coolant temperature sensor, crankshaft position sensor, distributor (includes rotor and camshaft position sensor), ignition coil, manifold absolute pressure sensor and throttle position sensor. See ENGINE SENSORS & SWITCHES for component testing.
EMISSION SYSTEMS & SUB-SYSTEMS
CRANKCASE VENTILATION SYSTEM
System and component testing information is not available from manufacturer.
FUEL EVAPORATION
System and component testing information is not available from manufacturer.
MISCELLANEOUS CONTROLS
A/C COMPRESSOR CLUTCH
A/C Compressor Clutch Relay
Some relays have battery voltage supplied to terminal No. 30. Other haves battery voltage supplied to terminals No. 87 or No. 87A. See Fig. 2. In de-energized position, relay should have continuity between terminals No. 87A and No. 30. Resistance value between terminals No. 85 and No. 86 should be 70-80 ohms for resistor type relays, or 81-91 ohms for diode type relays.
NOTE: Also see appropriate A/C clutch relay circuits tests in G - 2.5L & 4.0L TESTS W/ CODES article in the ENGINE PERFORMANCE Section.
RADIATOR (COOLING) FAN
Radiator (Cooling) Fan Relay
Some relays have battery voltage connected to terminal No. 30. Other haves battery voltage supplied to terminals No. 87 or No. 87A. See Fig. 2. In de-energized position, relay should have continuity between terminals No. 87A and No. 30. Resistance value between terminals No. 85 and No. 86 should be 70-80 ohms for resistor type relays, or 81-91 ohms for diode type relays.
NOTE: Also see appropriate radiator (cooling) fan relay circuit tests in G - 2.5L & 4.0L TESTS W/ CODES article in this section.