1988 Jeep Cherokee
1988 Electronic Fuel Injection JEEP MULTI-POINT
4.0L Cherokee, Comanche, Wagoneer DESCRIPTION
The Multi-Point Electronic Fuel Injection (EFI) system is an electronically controlled system which combines electronic sequential fuel injection and electronic spark advance systems. Main sub-systems consist of: air induction, fuel delivery, fuel control, emission control, Electronic Control Unit (ECU), data sensors and switches.
Air induction system includes air cleaner, throttle body, Throttle Position Sensor (TPS) and the Idle Speed Stepper (ISS) motor.
Fuel delivery system provides fuel from fuel pump to the fuel control system. Fuel system is composed of an in-tank electric fuel pump, fuel filter and return line. Power is provided to operate fuel pump through a fuel pump relay located on right inner fender panel.
Fuel control system handles actual fuel delivery into the engine. Fuel pressure regulator maintains a constant fuel pressure of 31-39 psi (2.1-2.7 kg/cm). In addition to the regulator, fuel system consists of the fuel rail and 4 fuel injectors. On MPI engine, ECU controls EGR/EVAP solenoid operation.
The ECU is a digital microprocessor computer. ECU receives input signals from various switches and sensors. ECU then computes fuel injector pulse width ("on" time), spark advance, ignition module dwell, idle speed, canister purge cycles, EGR flow and feedback control from this information.
OPERATION
AIR INDUCTION
Air is drawn into combustion chamber through air cleaner and intake manifold. Amount of air entering engine is controlled by position of throttle body valve. Throttle body houses throttle position sensor (TPS) and idle speed solenoid (ISS) motor. TPS is an electrical resistor which is connected to throttle valve. TPS transmits a signal to ECU in relation to throttle valve angle. This signal is used in calculations to determine injector pulse width to provide adequate air/fuel mixture.
ECU controls idle speed by providing appropriate voltage outputs to move ISS motor pin inward or outward to maintain a predetermined idle speed. ECU continuously monitors TPS and ISS motor and issues change commands to injectors to increase or decrease amount of fuel injected.
FUEL DELIVERY
Power to fuel pump relay is supplied from ignition switch when in "ON" or "START" position, at which time the ECU supplies a ground for fuel pump relay. When relay contacts are closed, power is applied to fuel pump.
Fuel is drawn through one end of a roller-type electric fuel pump, compressed and forced out opposite end. Pump capacity is greater than maximum engine consumption so that pressure in fuel system is always maintained.
FUEL CONTROL
Fuel control system handles actual delivery of fuel to engine. See Fig. 1. Fuel from fuel pump enters fuel rail, injectors and pressure regulator. Based upon a manifold vacuum signal, pressure regulator maintains a constant fuel pressure in fuel system of approximately 31-39 psi (2.1-2.7 kg/cm) by allowing excess fuel to return to fuel tank.
Fuel injectors are electrically operated solenoid valves which are energized by the ECU. The ECU determines injector pulse width ("on" time) based upon input from the various sensors.
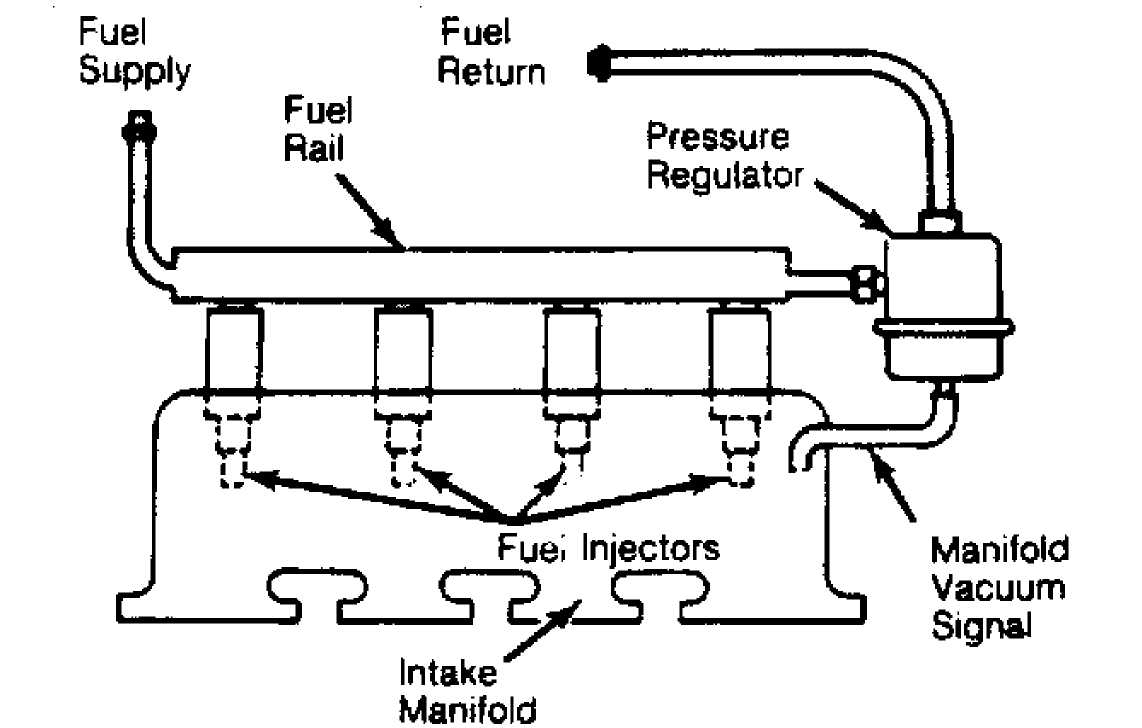
 Fig.
1: Fuel Control Components Courtesy
of Chrysler Motors.
Fig.
1: Fuel Control Components Courtesy
of Chrysler Motors.
EMISSION CONTROL
ECU controls EGR valve and fuel evaporative operation. By energizing the EGR/EVAP solenoid, vacuum is shut off, making this system non-operative. When engine reaches normal operating temperatures, ECU de-energizes solenoid. When de-energized, solenoid allows vacuum to flow to EGR valve. ECU will energize solenoid whenever EGR action is undesirable, during idle, cold engine operation, wide open throttle and rapid acceleration or deceleration.
ELECTRONIC CONTROL UNIT (ECU)
ECU is a digital microprocessor computer. Data sensors provide the ECU with engine operating information in varying electrical signals. ECU calculates this information and corrects air/fuel ratio, ignition timing, and emission control as needed to maintain efficient engine operation. Other ECU output signals control upshift indicator light (manual transmission only), ignition module dwell and A/C clutch operation.
UPSHIFT INDICATOR
On vehicles equipped with a manual transmission, ECU controls upshift indicator light. Indicator light is normally illuminated when ignition is turned on without engine running. Indicator light is turned off when engine is started.
Indicator light will be illuminated during engine operation in response to engine load and speed. If transmission is not shifted, ECU will turn light off after 3 to 5 seconds. A switch located on transmission prevents indicator light from being illuminated when transmission is shifted to highest gear.
DATA SENSORS & SWITCHES
Manifold Absolute Pressure (MAP) Sensor
MAP sensor is located in engine compartment on firewall,
behind engine. MAP sensor monitors manifold vacuum via a vacuum line
from intake manifold to sensor.
MAP sensor supplies an electrical signal which keeps ECU
informed of manifold vacuum and barometric pressure conditions. This
information is combined with data supplied by other sensors to
determine correct air/fuel ratio.
Oxygen Sensor
Oxygen (O2) sensor is mounted in exhaust manifold where it is exposed to exhaust gas flow. Its function is to monitor oxygen content of exhaust gases and to supply ECU with a voltage signal directly proportional to this content.
If oxygen content of exhaust gases is high (lean air/fuel mixture), voltage signal to ECU is low. As oxygen content decreases (mixture becomes richer), signal voltage increases.
In this way, ECU is kept constantly informed of air/fuel ratio. ECU can then alter fuel injector "on" time, in response to these signals, to obtain best air/fuel ratio of 14.7:1 under any given operating conditions.
O2 sensor is equipped with a heating element that keeps sensor at proper operating temperatures. Maintaining correct sensor temperatures at all times guarantees a more accurate signal to ECU. By using an O2 heater, fuel control system may also enter "closed loop" operating mode sooner and maintain this mode, even during periods of extended idle.
Temperature Sensors
There are 2 temperature sensors used on this system. Manifold Air Temperature (MAT) sensor, mounted in intake manifold, measures temperature of incoming air/fuel mixture and Coolant Temperature Sensor (CTS), located on left side of cylinder block just below the exhaust manifold, measures temperature of engine coolant.
Information provided by these 2 sensors to ECU allows ECU to demand slightly richer air/fuel mixtures and higher idle speeds during cold engine operation.
Throttle Position Sensor (TPS)
TPS is regulated by movement of throttle shaft. It is
mounted on throttle body and senses angle of throttle blade opening.
A voltage signal of up to 5 volts at wide open throttle is produced by TPS. Voltage varies with throttle angle changes. This signal is transmitted to ECU where it is used to adjust air/fuel ratio during acceleration, deceleration, idle, and wide open throttle conditions.
A dual TPS is used on models with automatic transmissions. This dual TPS not only provides ECU with input voltages but also supplies automatic transmission control unit with input signals relative to throttle position.
Knock Sensor
Knock sensor (detonation sensor) is located on lower left side of cylinder block just above oil pan. Knock sensor picks up detonation vibration from engine and converts it to an electrical signal for use by ECU.
ECU uses this information to determine when a change in ignition timing is required. Knock sensor allows for engine operation on either "premium" unleaded or "regular" unleaded fuel.
When knock occurs, ECU retards ignition timing in one or more cylinders until detonation is eliminated.
Speed Sensor
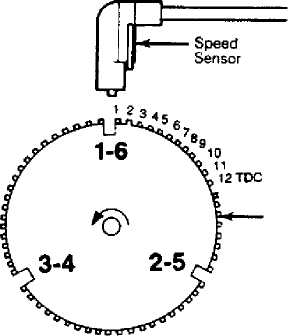
Speed sensor is secured by special shouldered bolts to flywheel/drive plate housing. Speed sensor is nonadjustable and preset at factory. Speed sensor senses TDC and engine speed by detecting flywheel teeth as they pass pick-up coil during engine operation. See Fig. 2.
Flywheel has a large trigger tooth and notch located 12 small teeth before each TDC position. When a small tooth and notch pass the magnetic core in sensor, concentration and collapse of the magnetic field created induces a small voltage spike into sensor pick-up coil windings. These small voltage spikes are sent to ECU, allowing ECU to count the teeth as they pass sensor.
When a large tooth and notch pass magnetic core in sensor, increased concentration and collapse of the magnetic field induces a higher voltage spike than smaller teeth. Higher spike indicates to ECU that a piston will soon be at TDC position, 12 teeth later. Ignition timing for cylinder is either advanced or retarded by ECU based upon "sensor input".
Flywheel Teeth
Fig. 2: Speed Sensor Operation Courtesy of Chrysler Motors.
Engine Switches
Several switches provide operating information to ECU. These
include Park/Neutral switch (automatic transmission only), air conditioning clutch, and Sync Pulse switch. When A/C or Park/Neutral switches supply ECU with an "on" signal, module signals ISS motor to change idle speed to a specific RPM.
With A/C on and throttle blade above a specific angle, ECU de-energizes A/C relay, preventing A/C clutch from engaging until throttle blade angle is reduced.
Sync pulse switch, located within distributor, generates a signal to ECU, helping to properly synchronize sequential fuel injection opening with intake valve opening.
ADJUSTMENTS
NOTE: Idle speed and air/fuel mixture are controlled by ECU and are non-adjustable. On-car adjustment procedures for other components should not be necessary during normal vehicle operation or maintenance. Adjustments of components should only be required when a faulty component is replaced with a new one.
THROTTLE POSITION SENSOR (TPS)
1) Turn
ignition on. Check throttle position sensor input
voltage. Connect
voltmeter negative lead to terminal "B" (M/T),
or
terminal "D" (A/T) of sensor
connector. Connect voltmeter positive
lead
to terminal "A" (M/T and A/T) of sensor connector.
NOTE: On (A/T) models, connector terminals are identified by
letters molded into back of connector. On all models, do not disconnect TPS harness connector. Insert voltmeter test leads through back of wire harness connector. On some models, it may be necessary to remove throttle body from intake manifold to gain access to sensor wire harness.
2) Move
and close throttle plate completely (M/T and A/T).
Ensure
throttle linkage contacts stop. Note voltmeter reading. Input
voltage
at terminals "B" and "A" (M/T), or
terminals "A" and "D"
(A/T) should be 5 volts.
Return
throttle plate to closed throttle position (M/T
and
A/T). Check sensor output voltage. To do
so, disconnect voltmeter
positive lead from terminal "A"
and connect it to terminal "C" (M/T),
or
terminal "B" (A/T).
Maintain
throttle plate in closed position (M/T and A/T).
Ensure throttle
linkage contacts stop. Note voltmeter reading. Output
voltage
should be .8 volt (M/T), or 4.2
volts (A/T).
If output
voltage is incorrect, loosen bottom sensor
retaining screw and
pivot sensor in adjustment slot for a coarse
adjustment. Loosen
top sensor retaining screw for fine adjustments.
Tighten screws
after adjustment.
TESTING & TROUBLE SHOOTING
PRELIMINARY CHECKS & PRECAUTIONS
Subsystem Checks
The following systems and components must be in good condition and operating properly before assuming a fuel injection system malfunction.
Air filter.
All support systems and wiring.
Battery connections and specific gravity.
Engine Compression.
Electrical connections on components and sensors.
Emission control devices.
Ignition system.
All vacuum line, fuel hose and pipe connections.
General Precautions
In order to prevent injury to operator or damage to system or component parts, use following techniques:
Turn
ignition off before connecting or disconnecting any
component
parts.
DO
NOT apply DC voltage greater than 12 volts
or any AC voltage
to system.
Disconnect battery cables before charging.
Remove
ECU from vehicle if ambient temperature could exceed
176F (80C).
DO NOT modify or circumvent any system functions.
SYSTEM TESTING
Fuel System Test
WARNING: Always relieve residual fuel pressure in fuel delivery
system before opening system. To prevent chance of personal injury, cover fittings with shop towel while disconnecting fittings.
1)
See Fig. 3. fitting.
2)
(2.1 kg/cm) 39 psi (2.6 regulator.
3)
at least one off. If fuel plugged fuel
Remove cap from pressure test port located in fuel rail. Connect Fuel Pressure Gauge (J-34730-1) to pressure
Start vehicle. Pressure should be approximately 31 psi
with vacuum hose connected to pressure regulator and kg/cm) with vacuum hose removed from pressure
Check fuel pump flow rate. A good fuel pump will deliver liter of fuel per minute with fuel return line pinched pump does not pump adequately, inspect fuel system for a filter or filter sock.
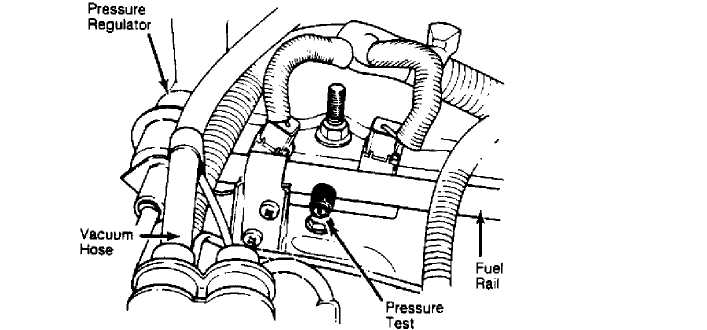
 Fig.
3: Fuel System Pressure Test Components
Courtesy of Chrysler Motors.
Fig.
3: Fuel System Pressure Test Components
Courtesy of Chrysler Motors.
4) Fuel pump flow rate can be checked by connecting one end of an old A/C gauge hose to fuel test port on fuel rail and inserting
other end of hose into a container of at least one liter or more capacity.
5) Run fuel pump by installing a jumper wire into diagnostic connector terminals D1-5 and D1-6. Be sure to pinch off fuel return line or most of fuel will be returned to fuel tank.
EGR Solenoid Test
Verify
that vacuum is present at vacuum fitting "C" of
EGR
solenoid. See Fig. 4. Remove vacuum
connector from "A" and "B".
Connect
a vacuum gauge to "B".
Start
and idle engine. There should be no vacuum at "B".
Disconnect
electrical connector "D" from solenoid. There should
now
be vacuum at "B".
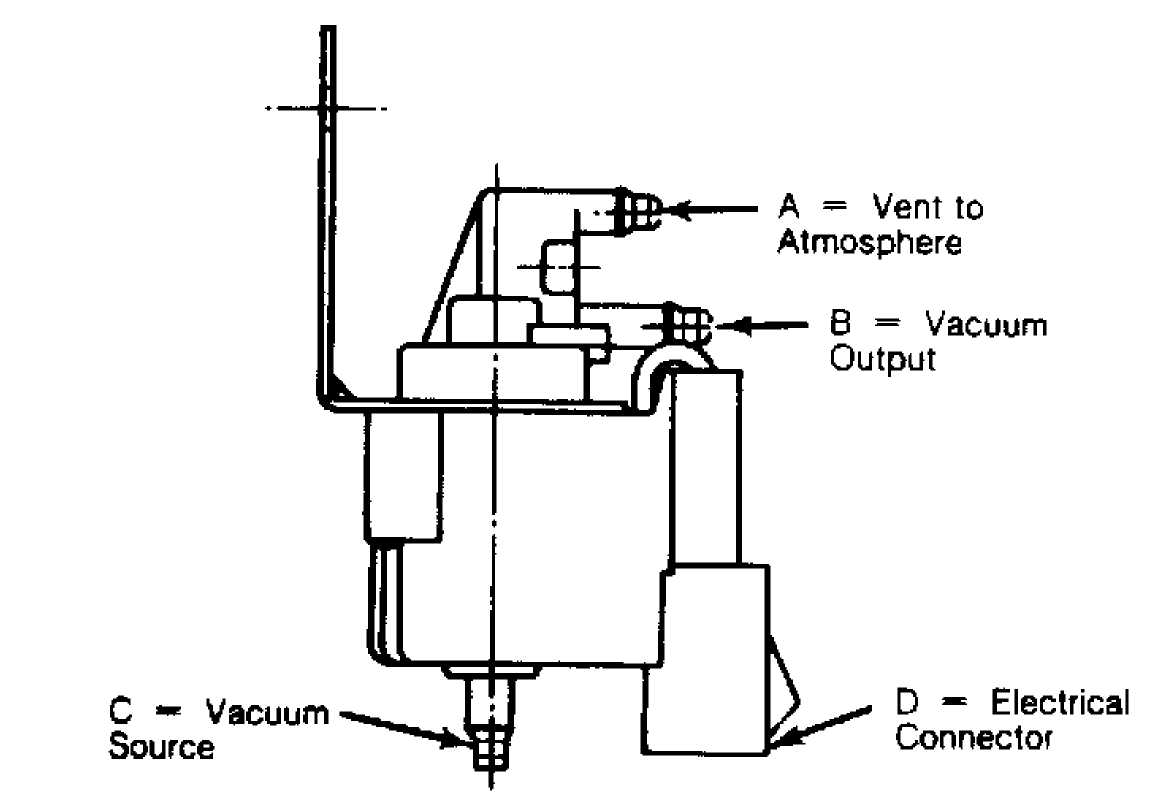
 Fig.
4: EGR Solenoid Test Points Courtesy
of Chrysler Motors.
Fig.
4: EGR Solenoid Test Points Courtesy
of Chrysler Motors.
MAP Sensor Test
Inspect
MAP sensor hoses and connections. Repair as
necessary.
With ignition on and engine off, test MAP sensor output
voltage
at connector terminal "B". (Marked
on sensor body). See
Fig. 5.
Output voltage should be 4 to
5 volts.
To verify
wiring harness condition, test ECU terminal C-6
for same voltage
described. Test MAP sensor supply voltage at sensor
connector
terminal "C" with ignition on.
Voltage
should be 4.5-5.5 volts. Same voltage
should also
be at terminal C-14 of ECU
wire harness connector. Using Diagnostic
Tester (M.S. 1170),
test MAP sensor ground circuit at terminal
D-3
and terminal "A" of
sensor connector.
Using an
ohmmeter, test MAP sensor ground circuit at ECU
connector between
terminal D-3 of ECU connector and terminal B-11
with an ohmmeter.
If ohmmeter or diagnostic tester indicates an open
circuit, inspect for a defective sensor ground connection, located on right side of cylinder block. If ground connection is good, ECU may need to be replaced.
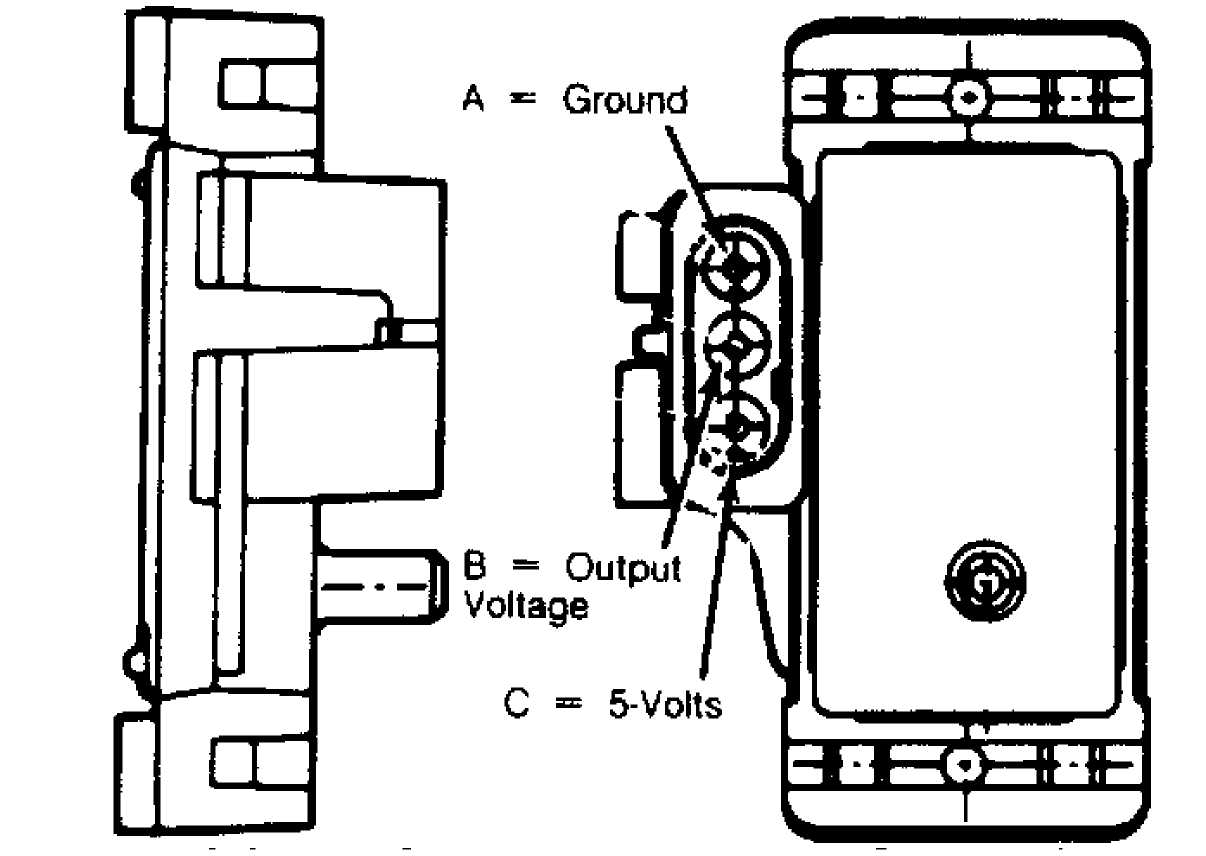
Fig. 5: MAP Sensor Test Points Courtesy of Chrysler Motors.
O2 Sensor Heating Element Test
Disconnect O2 sensor connector. Connect an ohmmeter to terminals "A" and "B" only (marked on the connector) of O2 sensor connector. Resistance should be between 5 and 7 ohms. Replace sensor if ohmmeter indicates an infinity reading.
CTS Test
Disconnect
wire harness connector from CTS sensor. Test
resistance
of sensor with a high impedance digital ohmmeter.
Resistance
should be less than 1000 ohms with engine
warm. See
TEMPERATURE-TO-RESISTANCE
VALUES table.
Test
resistance of wire harness between ECU terminal D-3
and sensor
connector terminal. Repeat test at terminal C-10 of ECU
and
sensor connector terminal. Repair wire harness if an open circuit
is
indicated.
MAT Sensor Test
Disconnect
wire harness connector from MAT sensor. Test
resistance
of sensor with a high impedance digital ohmmeter.
Resistance
should be less than 1000 ohms with engine
warm. Replace
sensor if resistance is not within specified range.
See
TEMPERATURE-TO-RESISTANCE VALUES
table.
Test
resistance of wire harness between ECU wire harness
connector
terminal D-3 and sensor connector terminal. Repeat
test
with terminal C-8 at ECU and sensor connector terminal.
Repair wire
harness if an open circuit or
resistance is greater than one ohm is
indicated.
TPS Test
See THROTTLE POSITION SENSOR TEST PROCEDURE chart in this article.
TEMPERATURE-TO-RESISTANCE VALUES (CTS & MAT SENSOR) TABLE
 °F °C Ohms
(Approximate)
212 100 185
160 70 450
100 38 1600
70 20 3400
40 4 7500
20 -7 13,500
0 -18 25,000
-40 -40 100,700
Knock Sensor Test
Start
engine until engine reaches normal operating
temperature. Connect
Diagnostic Tester (M.S. 1700). Observe
knock
value on tester. Using tip of screw driver, gently tap on
cylinder
block next to knock sensor and
observe knock sensor value on tester.
Knock
sensor value should increase while tapping on
cylinder block. If
knock sensor value does not increase while tapping
on cylinder
block, check knock sensor for proper connection. If
connection is
good, replace knock sensor.
Speed Sensor Test
Disconnect speed sensor connector from ignition control module. Place an ohmmeter between terminals "A" and "B". (Marked on connector) Reading should be 125-275 ohms with engine hot. Replace sensor if readings are not within specifications.
Idle Speed Stepper (ISS) Motor
Set
parking brake and block drive wheels. Route all
tester cables
away from cooling fans, drive belts, pulleys and
exhaust system.
Always allow engine speed to return to normal before
disconnecting
testing tools.
With ignition off, disconnect ISS motor connector at
throttle body. Connect Exerciser Tool (Part No. 8980 002 646) into ISS motor. See Fig. 6.
3) Connect
Red clip to battery positive cable. Connect
Black clip to battery
negative cable. Red light on exerciser tool
will illuminate when
properly connected. Start engine.
NOTE: When switch on exerciser tool is in "High" or "Low"
position, light on exerciser tool will flash indicating voltage pulses are being sent to ISS motor.
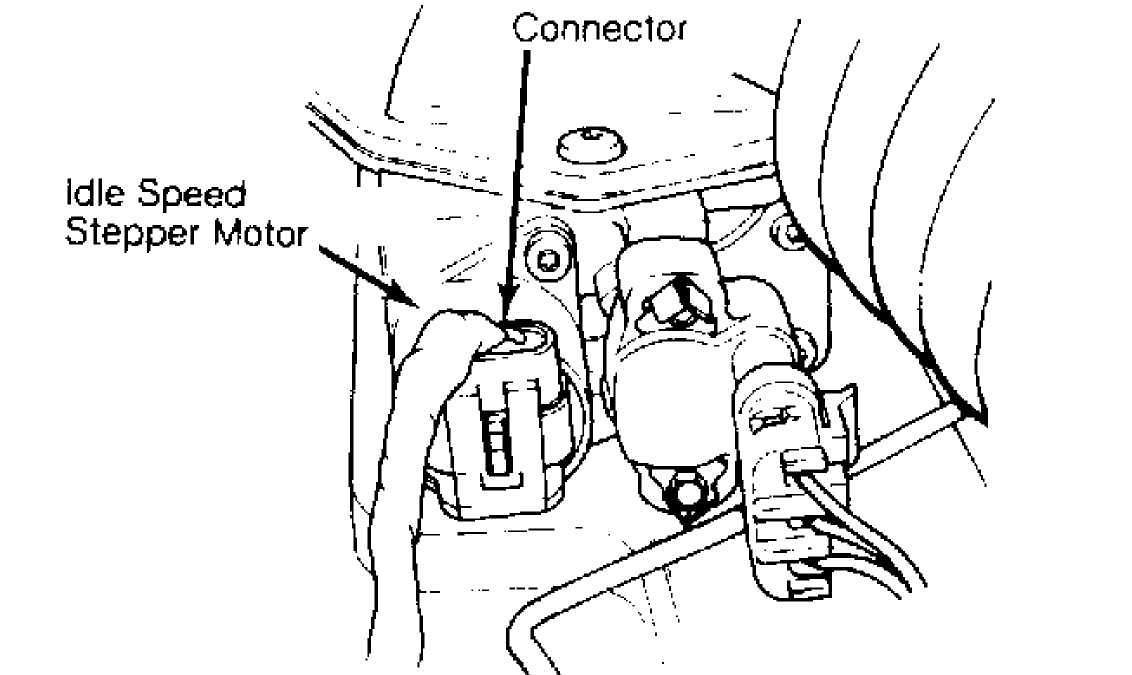
Fig. 6: ISS Motor Test Connector Courtesy of Chrysler Motors.
Fuel Injector Test
Move
exerciser tool switch to "High" position. Engine
speed
should increase. Move switch to "Low" position. Engine
speed
should decrease. If engine speed increases or decreases
while using
exerciser tool, ISS motor is functioning properly.
Disconnect
exerciser tool and reconnect ISS motor
connector. If engine speed
does not change, turn ignition off and
remove ISS motor from
throttle body.
With
ignition off, switch exerciser tool between "High"
and
"Low" positions. Check movement of ISS motor pintle.
Pintle
should move in and out. If pintle does not move, replace
ISS motor.
Start
engine and test new ISS motor for proper
operation. If pintle
operates properly, check ISS motor bore in
throttle body for
blockage and clean as necessary. Reinstall ISS
motor into
throttle body.
See FUEL INJECTOR TEST PROCEDURE chart in this article.
REMOVAL & INSTALLATION
COOLANT TEMPERATURE SENSOR (CTS)
Removal & Installation
Drain cooling system. Remove air cleaner assembly.
Disconnect CTS wire connector. Remove CTS from engine block. Install replacement CTS and connect CTS wire connector. Install air cleaner assembly. Fill cooling system.
OXYGEN SENSOR
Removal & Installation
Raise and support vehicle. Disconnect O2 sensor wire
connector. Remove O2 sensor from exhaust manifold. Install O2 sensor and tighten to 30 ft. lbs. (41 N.m). Connect O2 sensor wire connector and lower vehicle.
KNOCK SENSOR
Removal & Installation
Raise and support vehicle. Disconnect knock sensor wire connector. Remove knock sensor from cylinder block. Install knock sensor and connect knock sensor wire connector. Lower vehicle.
SPEED SENSOR
Removal & Installation
Disconnect speed sensor wire connector. Remove 2 speed sensor retaining bolts at transmission housing. Install speed sensor and connect speed sensor wire connector.
STARTER MOTOR RELAY
Removal & Installation
Disconnect negative battery cable. Identify, tag and
disconnect wiring to relay. Remove relay retaining screws and remove relay from inner fender panel. Install replacement relay and connect relay wires. Connect negative battery cable. Test relay operation.
MANIFOLD AIR/FUEL TEMPERATURE (MAT) SENSOR
Removal & Installation
Disconnect wire connector from MAT sensor. Remove MAT sensor from intake manifold. To install, reverse removal procedure.
MANIFOLD ABSOLUTE PRESSURE (MAP) SENSOR
Removal & Installation
Disconnect wire connector, vacuum hose, and retaining nuts from MAP sensor. Remove sensor from firewall. To install, reverse removal procedure.
FUEL INJECTOR
WARNING: Always relieve residual fuel pressure in fuel delivery
system before opening system. To prevent chance of personal injury, cover fittings with shop towel while disconnecting fittings.
Removal
Disconnect fuel lines from fuel rail assembly. Disconnect injector wire harness connector. Remove fuel rail retaining bolts. Remove vacuum hose from fuel pressure regulator valve. Remove fuel injector retaining clips and remove fuel injectors. See Fig. 7. On models with (A/T), it may be necessary to remove throttle pressure cable and bracket to remove fuel rail assembly.
NOTE:
O-rings must be replaced before fuel lines are reassembled.
Installation
Install fuel injectors into fuel rail assembly and install retaining clips. Position fuel rail onto manifold while lining up injectors with holes in intake manifold. Secure injector retaining bolts. Connect injector wire connectors to proper injectors. Install fuel lines into fuel rail assembly. Connect vacuum hose to pressure regulator. Install throttle pressure bracket and cable (A/T).
 CHART
A-1, INOPERATIVE "SERVICE AIR COND." LIGHT
CHART
A-1, INOPERATIVE "SERVICE AIR COND." LIGHT
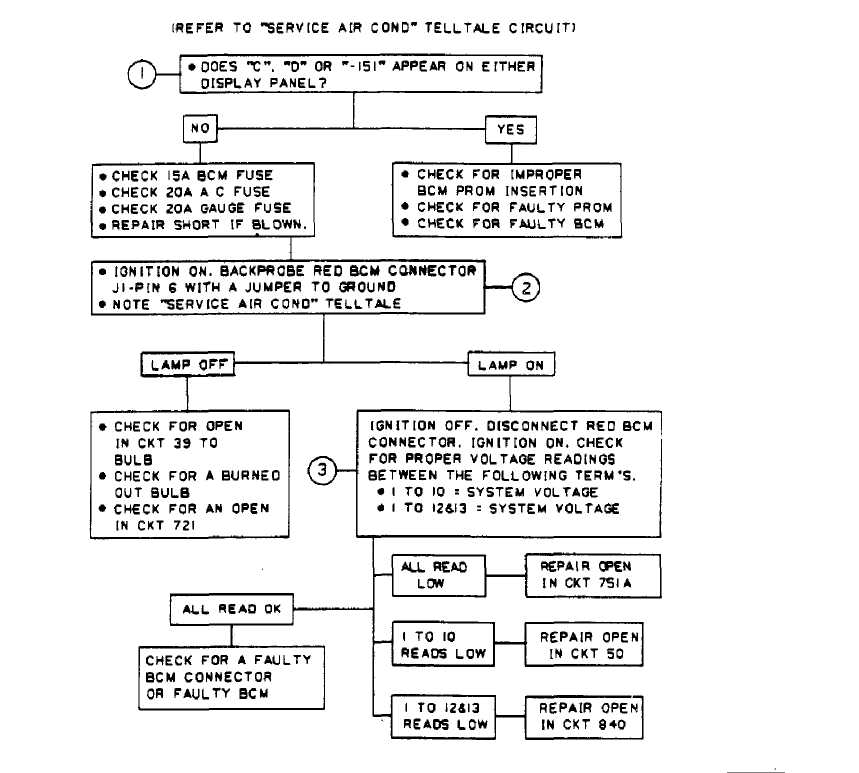
 Fig.
7: Fuel Rail Assembly Courtesy
of Chrysler Motors.
Fig.
7: Fuel Rail Assembly Courtesy
of Chrysler Motors.
FUEL PRESSURE REGULATOR
WARNING: Always relieve residual fuel pressure in fuel delivery
system before opening system. To prevent chance of personal injury, cover fittings with shop towel while disconnecting fittings.
Removal & Installation
Remove injector fuel rail assembly. Remove 2 pressure regulator retaining screws. Remove regulator from fuel rail. To install, reverse removal procedure. Adjust regulator after installation.
IDLE SPEED STEPPER (ISS) MOTOR
Removal & Installation
1) Disconnect ISS motor connector. Remove ISS motor retaining screws and ISS motor. To install, reverse removal procedure. No idle speed adjustment is necessary. Idle speed is controlled by the Electronic Control Unit (ECU).
THROTTLE POSITION SENSOR
Removal & Installation
Disconnect TPS wire connector. Bend retaining bolts lock tabs and remove retaining bolts. Remove TPS from throttle plate assembly. To install, reverse removal procedure. Adjust TPS after installation. See ADJUSTMENTS in this article.
EGR VALVE
Removal & Installation
Disconnect vacuum hose from EGR valve. Remove bolts which hold EGR valve to intake manifold. Remove valve and discard gasket. Clean intake manifold gasket mating surface. To install valve, reverse removal procedure. Always use new gasket. See Fig. 8.
Fig.
8: EGR Valve
Courtesy of Chrysler Motors.
EGR SOLENOID
CHART B-1, INOPERATIVE "SRVICE AIR COND." LIGHT
Disconnect solenoid vacuum hoses. Disconnect solenoid wiring connector. Remove solenoid retaining bolts and solenoid. To install valve, reverse removal procedure.
ECU CONNECTOR PIN IDENTIFICATION 24-PIN CONNECTOR MPFI TABLE
Terminal
No.
Wire Function
A1 Injector No. 3
A2 Injector No. 6
A3 Injector No. 2
A4 Injector No. 4
A5 Fuel Pump Relay
A6 Not Used
A7 Oxygen Sensor Relay
A8 Shift Light
A9 Latch Relay
A10 EGR/Evap. Solenoid
A1 1 Not Used
A12 A/C Relay
B1 Injector No. 1
B2 Injector No. 5
B3 AIS A
B4 AIS A1
B5 AIS C
B6 AIS C1
B7 Battery (Pos.)
B8 Ignition
B9 Not Used
B10 Latched B (Pos.)
B11 Ground
B12 Ground
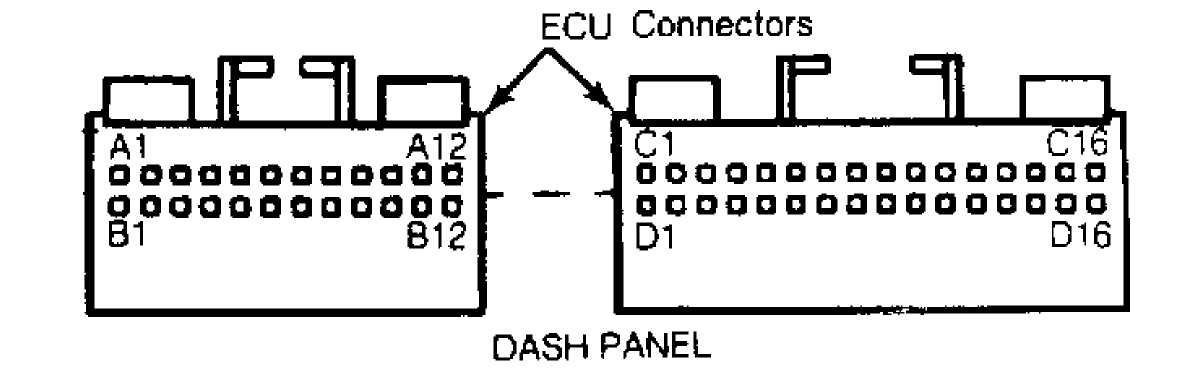
Fig. 9: Multi-Point Injection ECU Connector Courtesy of Chrysler Motors.
ECU CONNECTOR PIN IDENTIFICATION 32-PIN CONNECTOR MPFI TABLE
Terminal
No.
Wire Function
C1 Speed Sensor (Pos.)
C2 A/C Request
C3 Start
C4 P/N Switch
C5 Sync. (Neg. )
C6 MAP Sensor
C7 TPS Sensor
C8 Air Temp. Sensor
C9 Not Used
C10 Coolant Temp. Sensor
C11 Injection Supply
C12 TX Serial Data
C13 Not Used
C14 MAP Sensor Supply Voltage
C15 TPS Supply Voltage
C16 Sync. (Pos.)
D1 Speed Sensor (Neg.)
D2 A/C Select
D3 Sensor Ground
D4 Not Used
D5 Not Used
D6 Not Used
D7 Not Used
D8 Knock Sensor Ground
D9 Oxygen Sensor Input
D10 Injector Supply
D11 RX Serial Data
D12 Not Used
D13 Spark/Dwell
D14 Not Used
D15 Not Used
D16 Knock Sensor
*
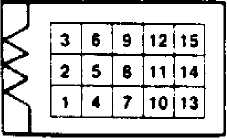
FRONT OF VEHICLE
CONNECTOR
D1 CONNECTOR D2

|
1. Tach Signal |
1. ECU Output (TX) |
|
2 Not Used |
2. RX Data (ECU) |
|
3. ECU Ground |
3. Latch Relay |
|
4. Not Used |
4. Ignition |
|
5. Battery (Pos} |
5. Latch Battery (Pos.) |
|
6. Fuel Pump (Pos.) |
6. A/C Clutch |
|
|
7. Ignition Ground |
|
|
8. Sensor Ground |
|
|
9. Oj Sensor Heater |
|
|
10. Not Used |
|
|
11. Shift Light |
|
|
12. Not Used |
|
|
13. Not Used |
|
|
14, Not Used |
|
|
15. Auto Transmission Diagnosis |
Fig. 10: Multi-Point Injection Diagnostic Connector Courtesy of Chrysler Motors.
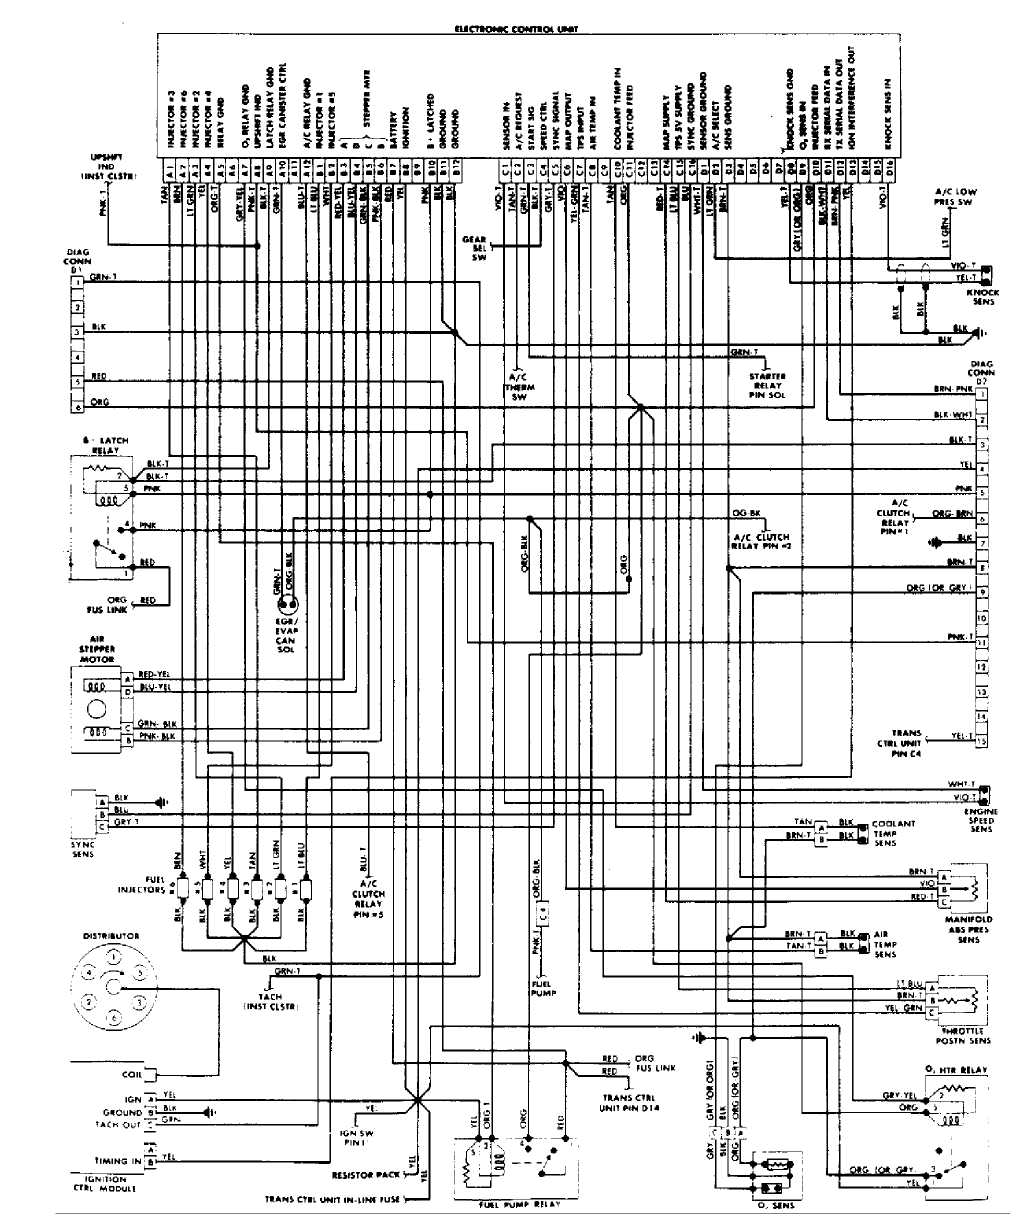
Fig. 11: Comanche Multi-Point Fuel Injection Wiring Diagram (Wiring Diagram Not Available for Cherokee & Wagoneer Models)
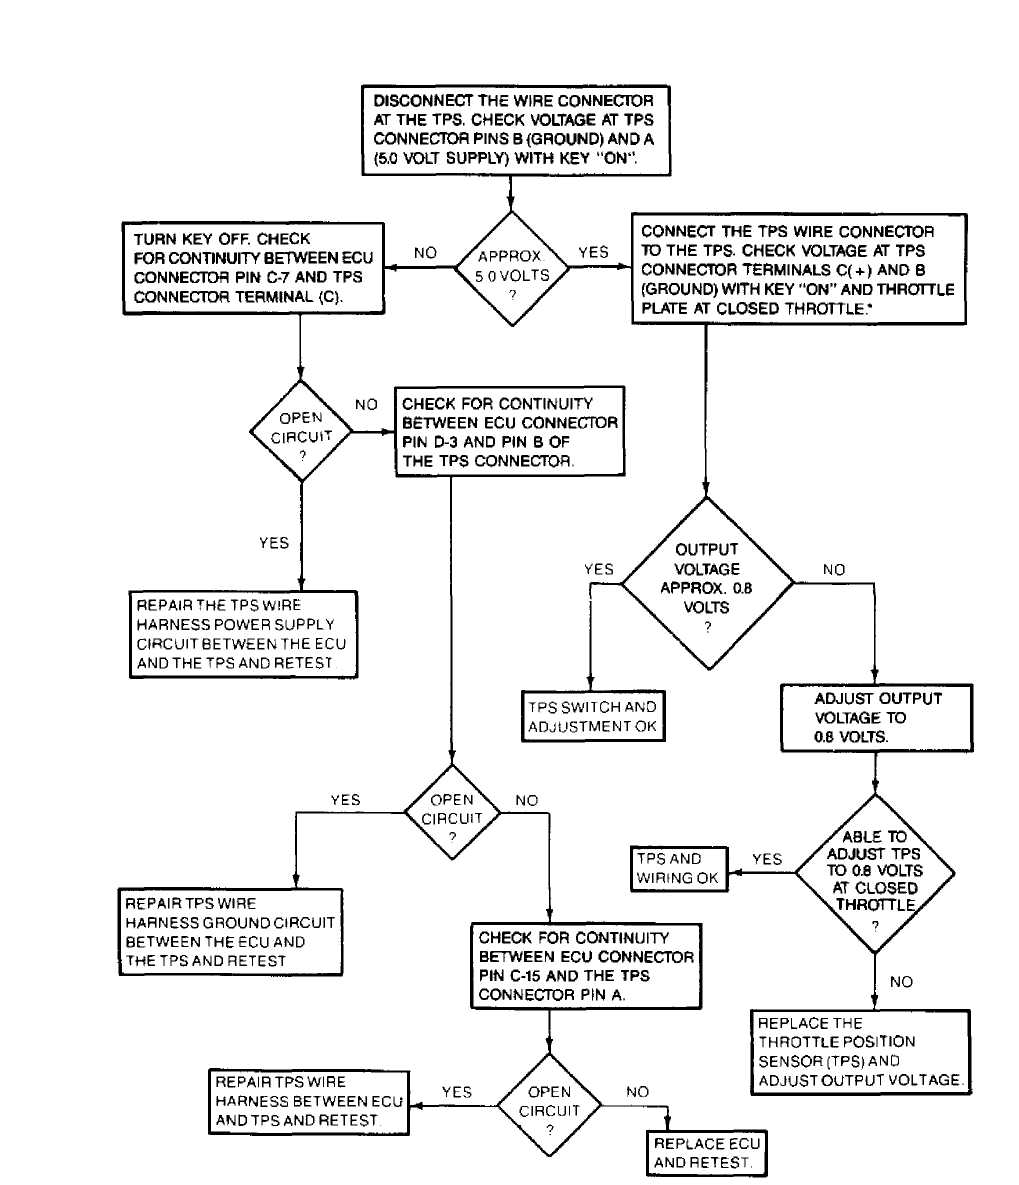
’ DO NOT UNFASTEN THE SENSOR WIRE HARNESS CONNECTOR. INSERT THE VOLTMETER TEST LEADS THROUGH THE BACK OF THE WIRE HARNESS CONNECTOR TO MAKE CONTACT WITH THE SENSOR TERMINALS.
FUEL INJECTOR TEST PROCEDURE CHART
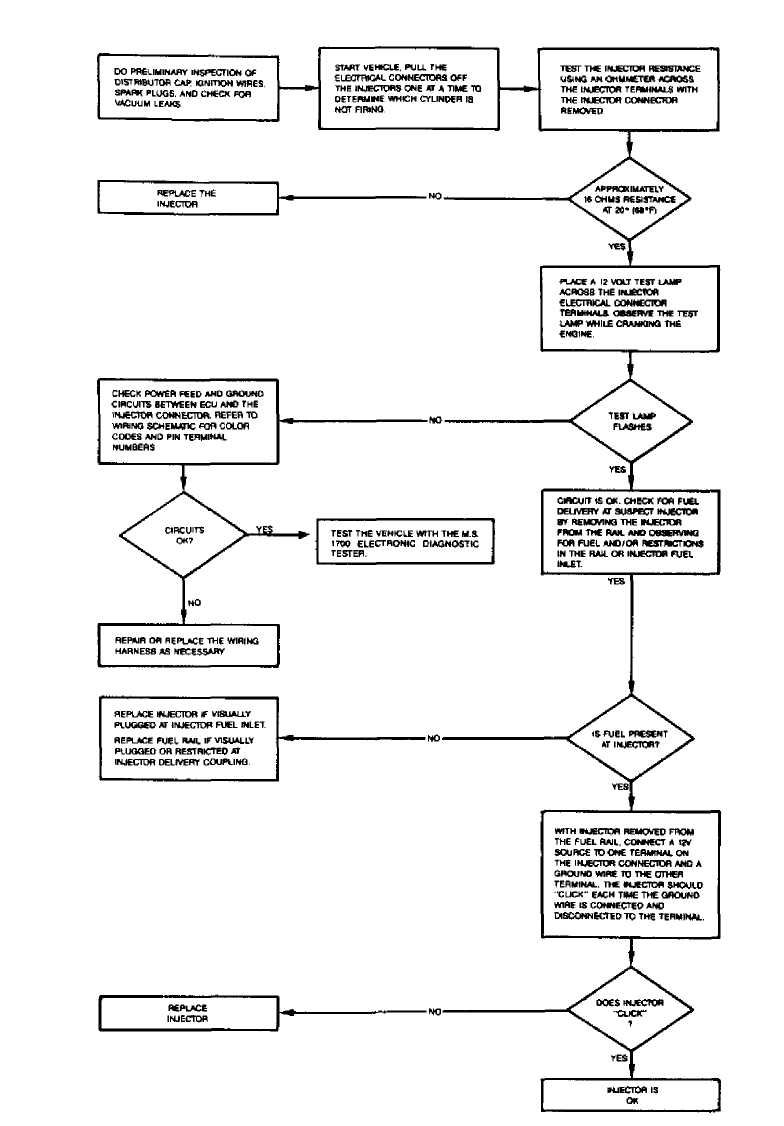
Fig. 13: Fuel Injector Test Procedure Chart