A/C COMPRESSOR OIL CHECKING
1988 Jeep Cherokee
A/C General Servicing
COMPRESSOR OIL CHECK
* PLEASE READ THIS FIRST *
CAUTION: When discharging air conditioning system, use only approved
refrigerant recovery/recycling equipment. Make every attempt
to avoid discharging refrigerant into the atmosphere.
ISOLATING COMPRESSOR - GRAND WAGONEER ONLY
1) Connect service gauge set to the compressor service valves
and open compressor valves slightly (turn clockwise). Start engine and
operate air conditioning. Slowly turn compressor suction valve
clockwise toward closed (front-seated) position.
2) When suction pressure is reduced to zero or less, turn off
engine and compressor and quickly turn suction valve stem in to full
front-seated position. Suction pressure should be slightly above zero.
Turn discharge valve into front-seated position.
3) To check oil lever, slowly open crankcase plug to relieve
any remaining pressure. After oil level is correct, cap service gauge
parts on both valves. Back-seat suction service valve to allow
refrigerant to enter compressor. Open discharge valve halfway.
4) Loosen discharge service valve cap, allowing refrigerant
pressure to force air out of compressor. Back-seat service valve and
tighten cap. Compressor is now ready for operation.
REFRIGERANT OIL
Only new, pure, moisture-free refrigerant oil should be used
in the air conditioning system. This oil is highly refined and
dehydrated to a point where moisture content is less than 10 parts per
million. The oil container must be tightly closed at all times when
not in use, or moisture will be absorbed from the air and introduced
into the refrigeration system.
DISCHARGING SYSTEM
CAUTION: When discharging air conditioning system, use only approved
refrigerant recovery/recycling equipment. Make every attempt
to avoid discharging refrigerant into the atmosphere.
If compressor has stem-type service valves, it can be
isolated and removed without discharging entire system. Otherwise,
discharge system completely using approved refrigerant
recovery/recycling equipment before loosening any fittings.
DISCONNECTING LINES & FITTINGS
After system is discharged, carefully clean area around all
fittings to be opened. Always use 2 wrenches when tightening or
loosening fittings to avoid twisting or distorting lines. Cap or plug
all openings as soon as lines are removed. Do not remove caps until
immediately before connections are made. This will keep entry of air
and moisture to a minimum, reducing the chance of damage to
components.
PLACING SYSTEM IN OPERATION
After component service or replacement has been completed and
all connections have been made, evacuate system throughly with
a
vacuum pump. Charge system with proper amount of refrigerant and
perform a leak test. Be sure to check all fittings that have been
opened. After system has been leak tested, make a system performance
check.
SANDEN SD508 5-CYLINDER OIL CHECKING
1) Discharge system using approved refrigerant
recovery/recycling equipment. Remove compressor belt and loosen
mounting bolts. Rotate compressor in brackets until filler plug is at
top. Clean area around filler plug and remove plug slowly. Rotate
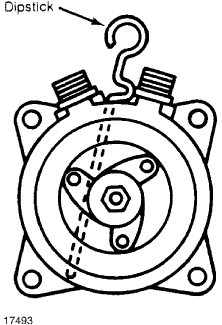
front hub plate so notch in lobe is 110 degrees from the bottom. This
rotates ball end of top piston to align with oil fill port and allows
clearance for dipstick. See Fig. 1.
2) Insert compressor dipstick diagonally from right to left
until stop on dipstick contacts filler plug surface. Remove dipstick
and note oil fill level. Each mark on dipstick represents one ounce
of oil. Add oil if necessary to reach 3-4 ounce level.

Fig. 1: Sanden 5-Cylinder Oil Level Checking
YORK - 2-CYLINDER - PURGINE COMPRESSOR
1) Remove gauge set and place caps on service valve ports.
Back-seat the suction service valve to allow refrigerant to enter
compressor.
2) Loosen discharge port valve slightly. Loosen valve port
cap to allow refrigerant to force out air from compressor. Back-seat
the discharge valve and tighten the port cap. Compressor is ready for
service.
YORK - 2-CYLINDER COMPRESSOR OIL CHECKING
1) Operate system for 10 minutes, then stop and isolate
compressor. Loosen filler plug slowly to release any pressure in
crankcase.
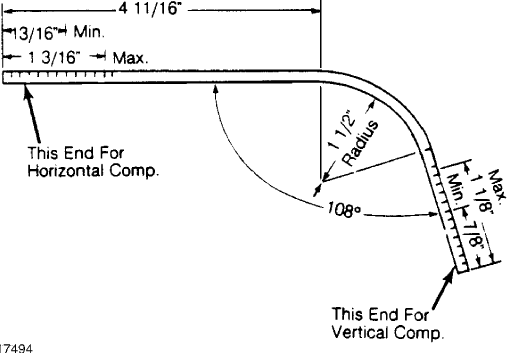
2) Use dipstick to check oil level. See Fig. 2. Add oil as
necessary, then install plug with new "O" ring. Purge compressor of
air.

Fig. 2: York A/C Compressor Oil Level Dipstick (Check oil w/ shaft
keyway facing head)
Courtesy of Chrysler Motors.