LOCKING HUBS - AUTOMATIC
1988 Jeep Cherokee
1988 Locking Hubs - Command-Trac & Selec-Trac Jeep
DESCRIPTION & OPERATION
Command-Trac locking hub is used on Model 30 front axles. This system can be shifted between 2WD and 4WD high range while vehicle is moving. The only time vehicle must be stopped to shift into or out of 4WD is when shifter is in low range. See Fig. 1.
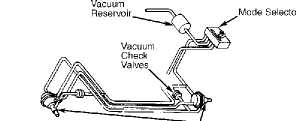
Selec-Trac locking hubs allow full or part time 4WD. Used on Model 30 front axles, system can be shifted into 2WD or 4WD modes only when vehicle is stopped. See Fig. 2.
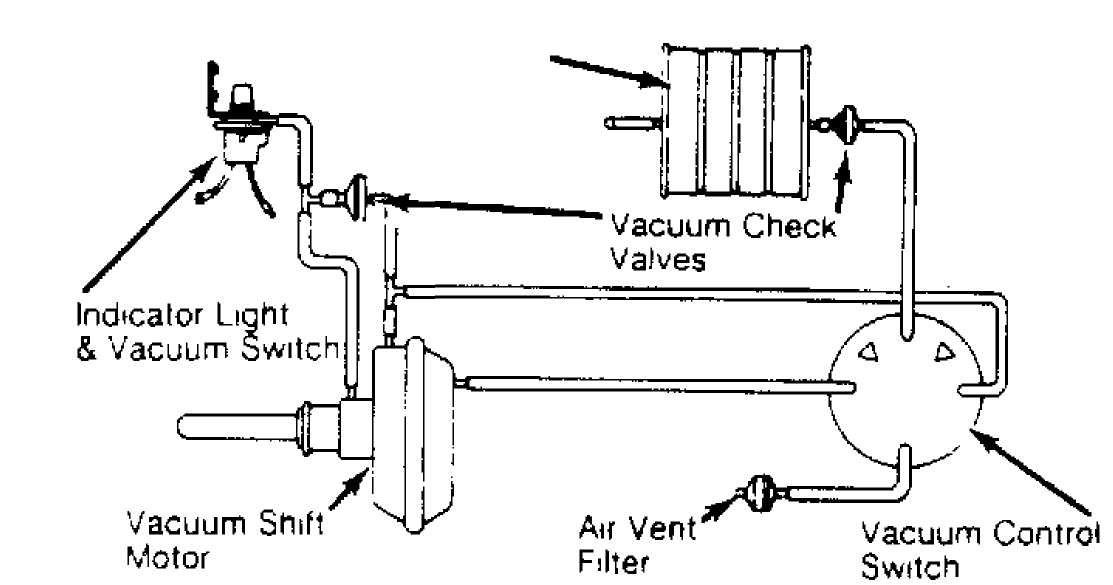
Vacuum Reservoir
Fig. 1: Command-Trac Vacuum Control System
 TROUBLE
SHOOTING
TROUBLE
SHOOTING
SELEC-TRAC SYSTEM
2WD To 4WD
Position mode select switch to "4WD" position while driving vehicle 2-3 MPH. Axle should ratchet and clunk into position. Transfer case should shift after axle shifts, accompanied by hissing sound from mode selector switch.
4WD To 2WD
1) Position mode select switch to "2WD" position. Transfer case should shift to 2WD and not allow shifting into 4WD or "LO" range. Axle should shift after transfer case shifts.
2) To determine if front axle has completed a shift out of 4WD into 2WD, position mode select switch back to "4WD" position while operating vehicle at slow speed. If vehicle shifts into 2WD, axle will ratchet. If shift is not completed, transfer case will shift into 4WD and hissing sound will come from mode select switch.
FRONT AXLE SHIFT MOTOR TEST
Disconnect
vacuum harness from front axle shift motor.
Connect
vacuum pump to shift motor front port. Apply 15 in.
Hg vacuum
to shift motor. Rotate right
front wheel to disengage axle.
Shift
motor should hold vacuum at least 30 seconds.
If
not, replace motor. If motor does hold vacuum, disconnect
vacuum pump
from shift motor front
port. Connect pump to shift motor rear port and
cap
transfer case connecting port. Apply 15 in.
Hg vacuum to motor.
Shift
motor should hold vacuum for at least 30 seconds.
If
not, replace motor. If motor does
hold vacuum, remove cap from shift
motor transfer case connecting
port and check for vacuum. If no vacuum
is present, rotate right
front wheel to ensure axle has shifted
completely. Axle must
completely shift to open shift motor connecting
port.
Recheck
vacuum at shift motor transfer case port. If
vacuum
is present, transfer case requires diagnosis. Command-Trac
uses
Model 207 transfer
case. Selec-Trac uses Model 228 transfer
case.
REMOVAL & INSTALLATION
LOCKING HUB
Removal
Remove
cover to outer clutch housing. Remove bearing race
spring
assembly. Remove sealing ring and seal bridge retainer.
Remove
bearing components.
Squeeze
tangs of wire retaining ring together with needle-
nose pliers.
Pull remaining components of automatic hub from wheel.
Installation
1) Ensure
lock ring is in position. Using Bearing Nut Wrench
(J-6893-D),
tighten wheel bearing adjusting nut to 50 ft.
lbs. (60 N.
m) to seat bearings.
32466 Vanuum Shift Motors
Fig. 2: Selec-Trac Vacuum Control System
AXLE SHIFT MOTOR & HOUSING
Back
off nut and tighten to 35 ft. lbs. (47
N.m) while
rotating
hub. Finally, back off nut a maximum of 3/8 turn.
Assemble
lock ring (with tab in keyway)
over axle shaft, against bearing
adjustment
nut.
Adjustment
nut pin must pass through one of the washer
holes.
Tighten outer adjusting nut to 183 ft.
lbs. (248 N.m). Align
outer
clutch housing splines with splines of wheel hub.
Loosen
cover screws 3 or 4 turns,
and push in on cover to
allow retaining
ring to expand into rotor hub groove. Tighten cover
cap
screws to 40-50 INCH lbs. (4.5-5.6
N.m).
Removal
Raise
and support vehicle. Drain shift housing fluid.
Disconnect vacuum
harness. Remove housing bolts. Remove motor and
housing.
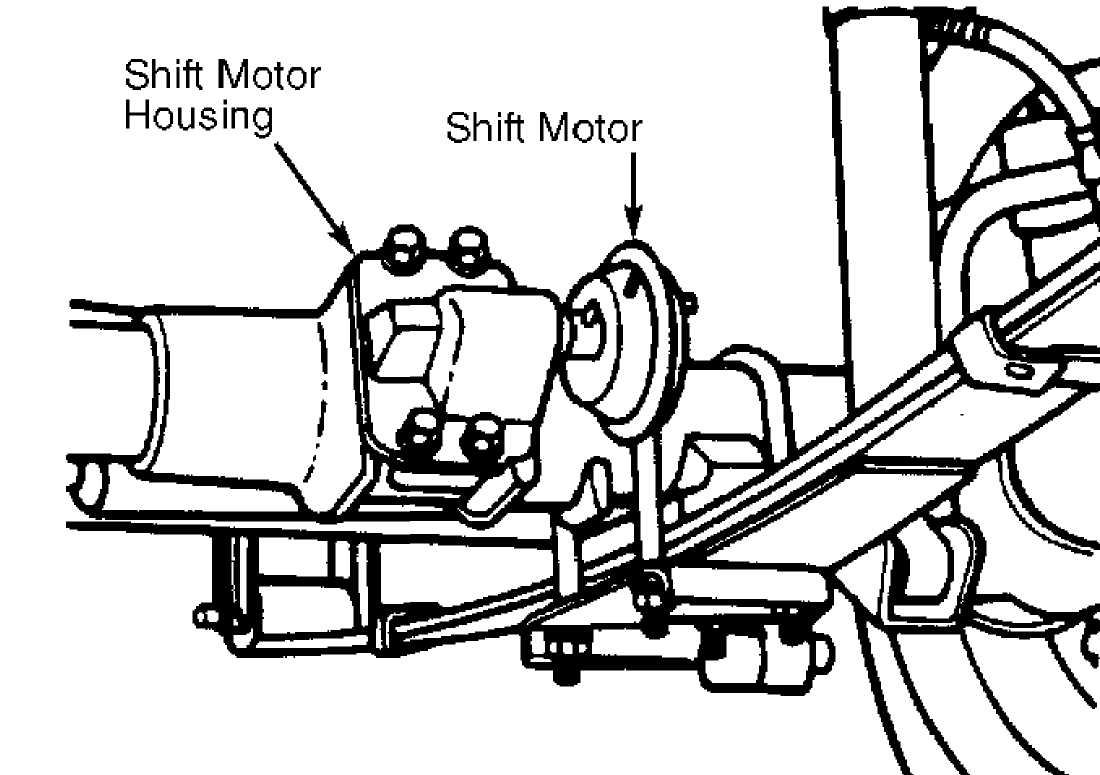
Mark shift fork and housing for reassembly. See Fig. 3.
Rotate
shift motor. Remove shift fork and motor snap
rings.
Remove shift motor from housing. Remove "O" ring
from motor.
Always use a new "O"
ring for reassembly.
Installation
Install new "O" ring on motor shaft. Install motor into
housing and slide shift fork onto shaft. Position motor and housing on axle. Add axle lubricant to shift motor housing. Install shift fork in shift collar and install housing bolts. Connect all vacuum harnesses to motor.
32464
Fig. 3: Shift Motor & Housing